Welcome to the Filtered Light Pullover Virtual Workshop!
Here, you will find the full knitting pattern, but expanded to include more detailed instructions for those that need a touch more help on this project.
~~~
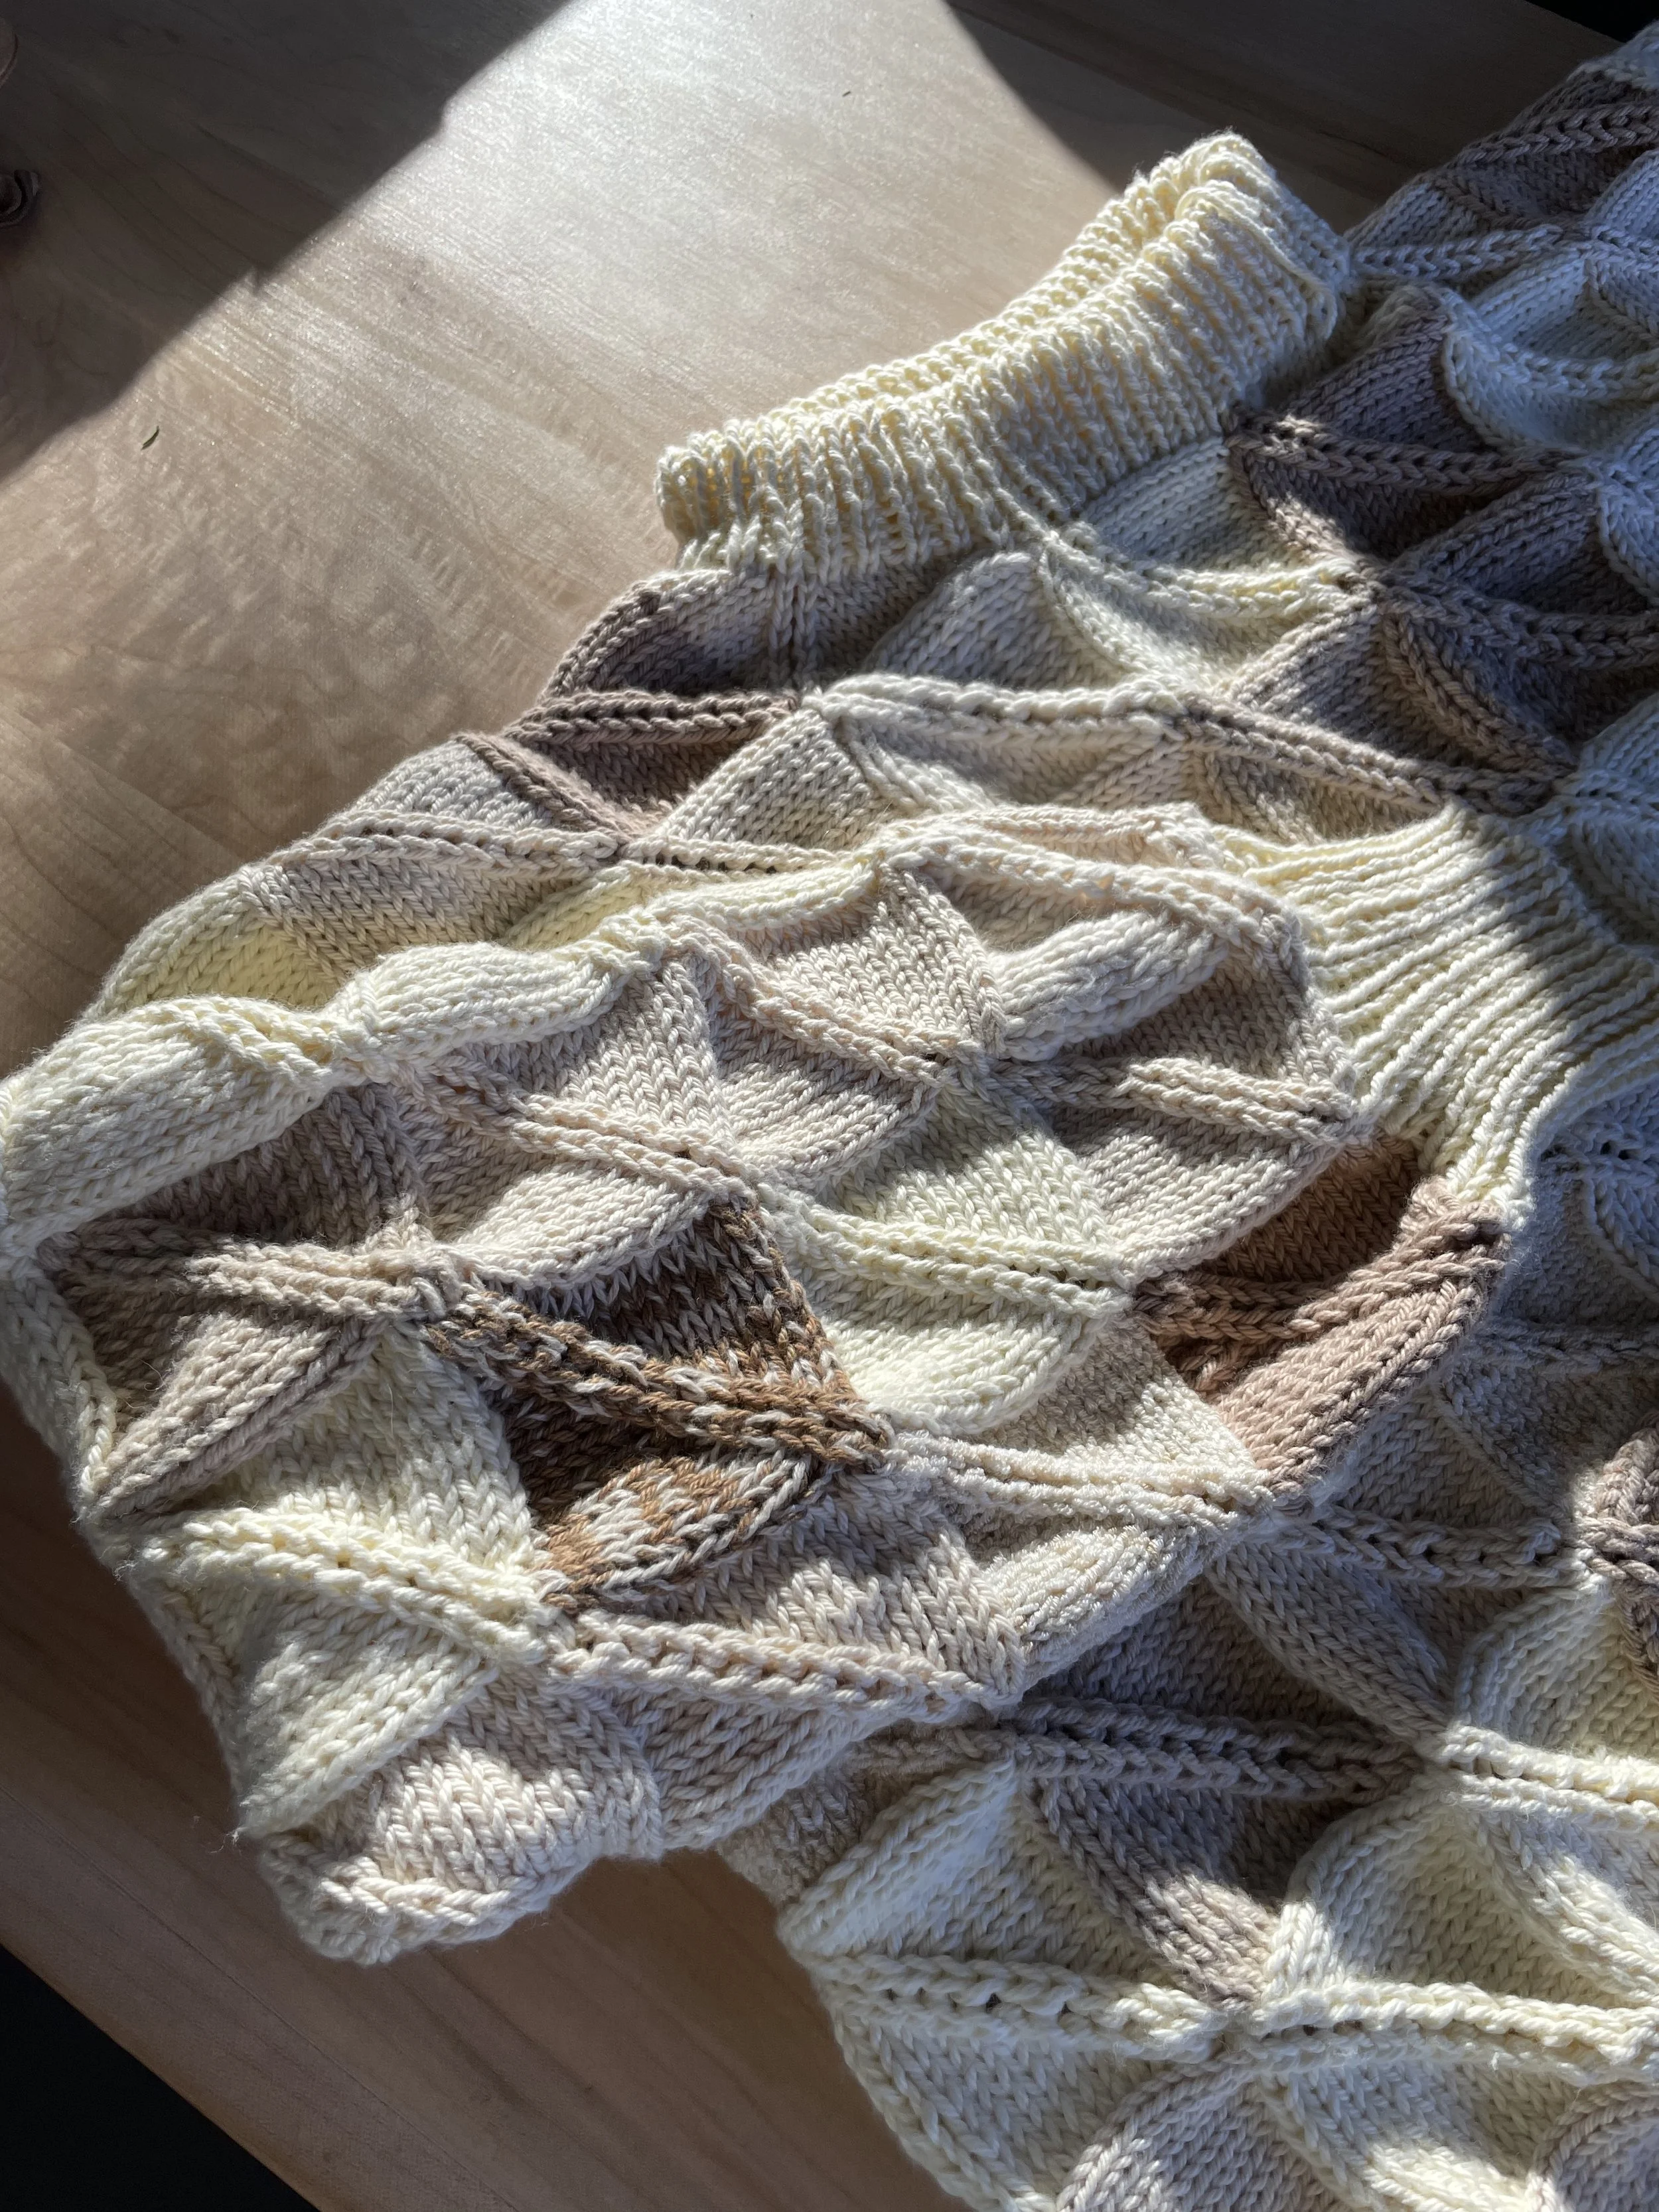
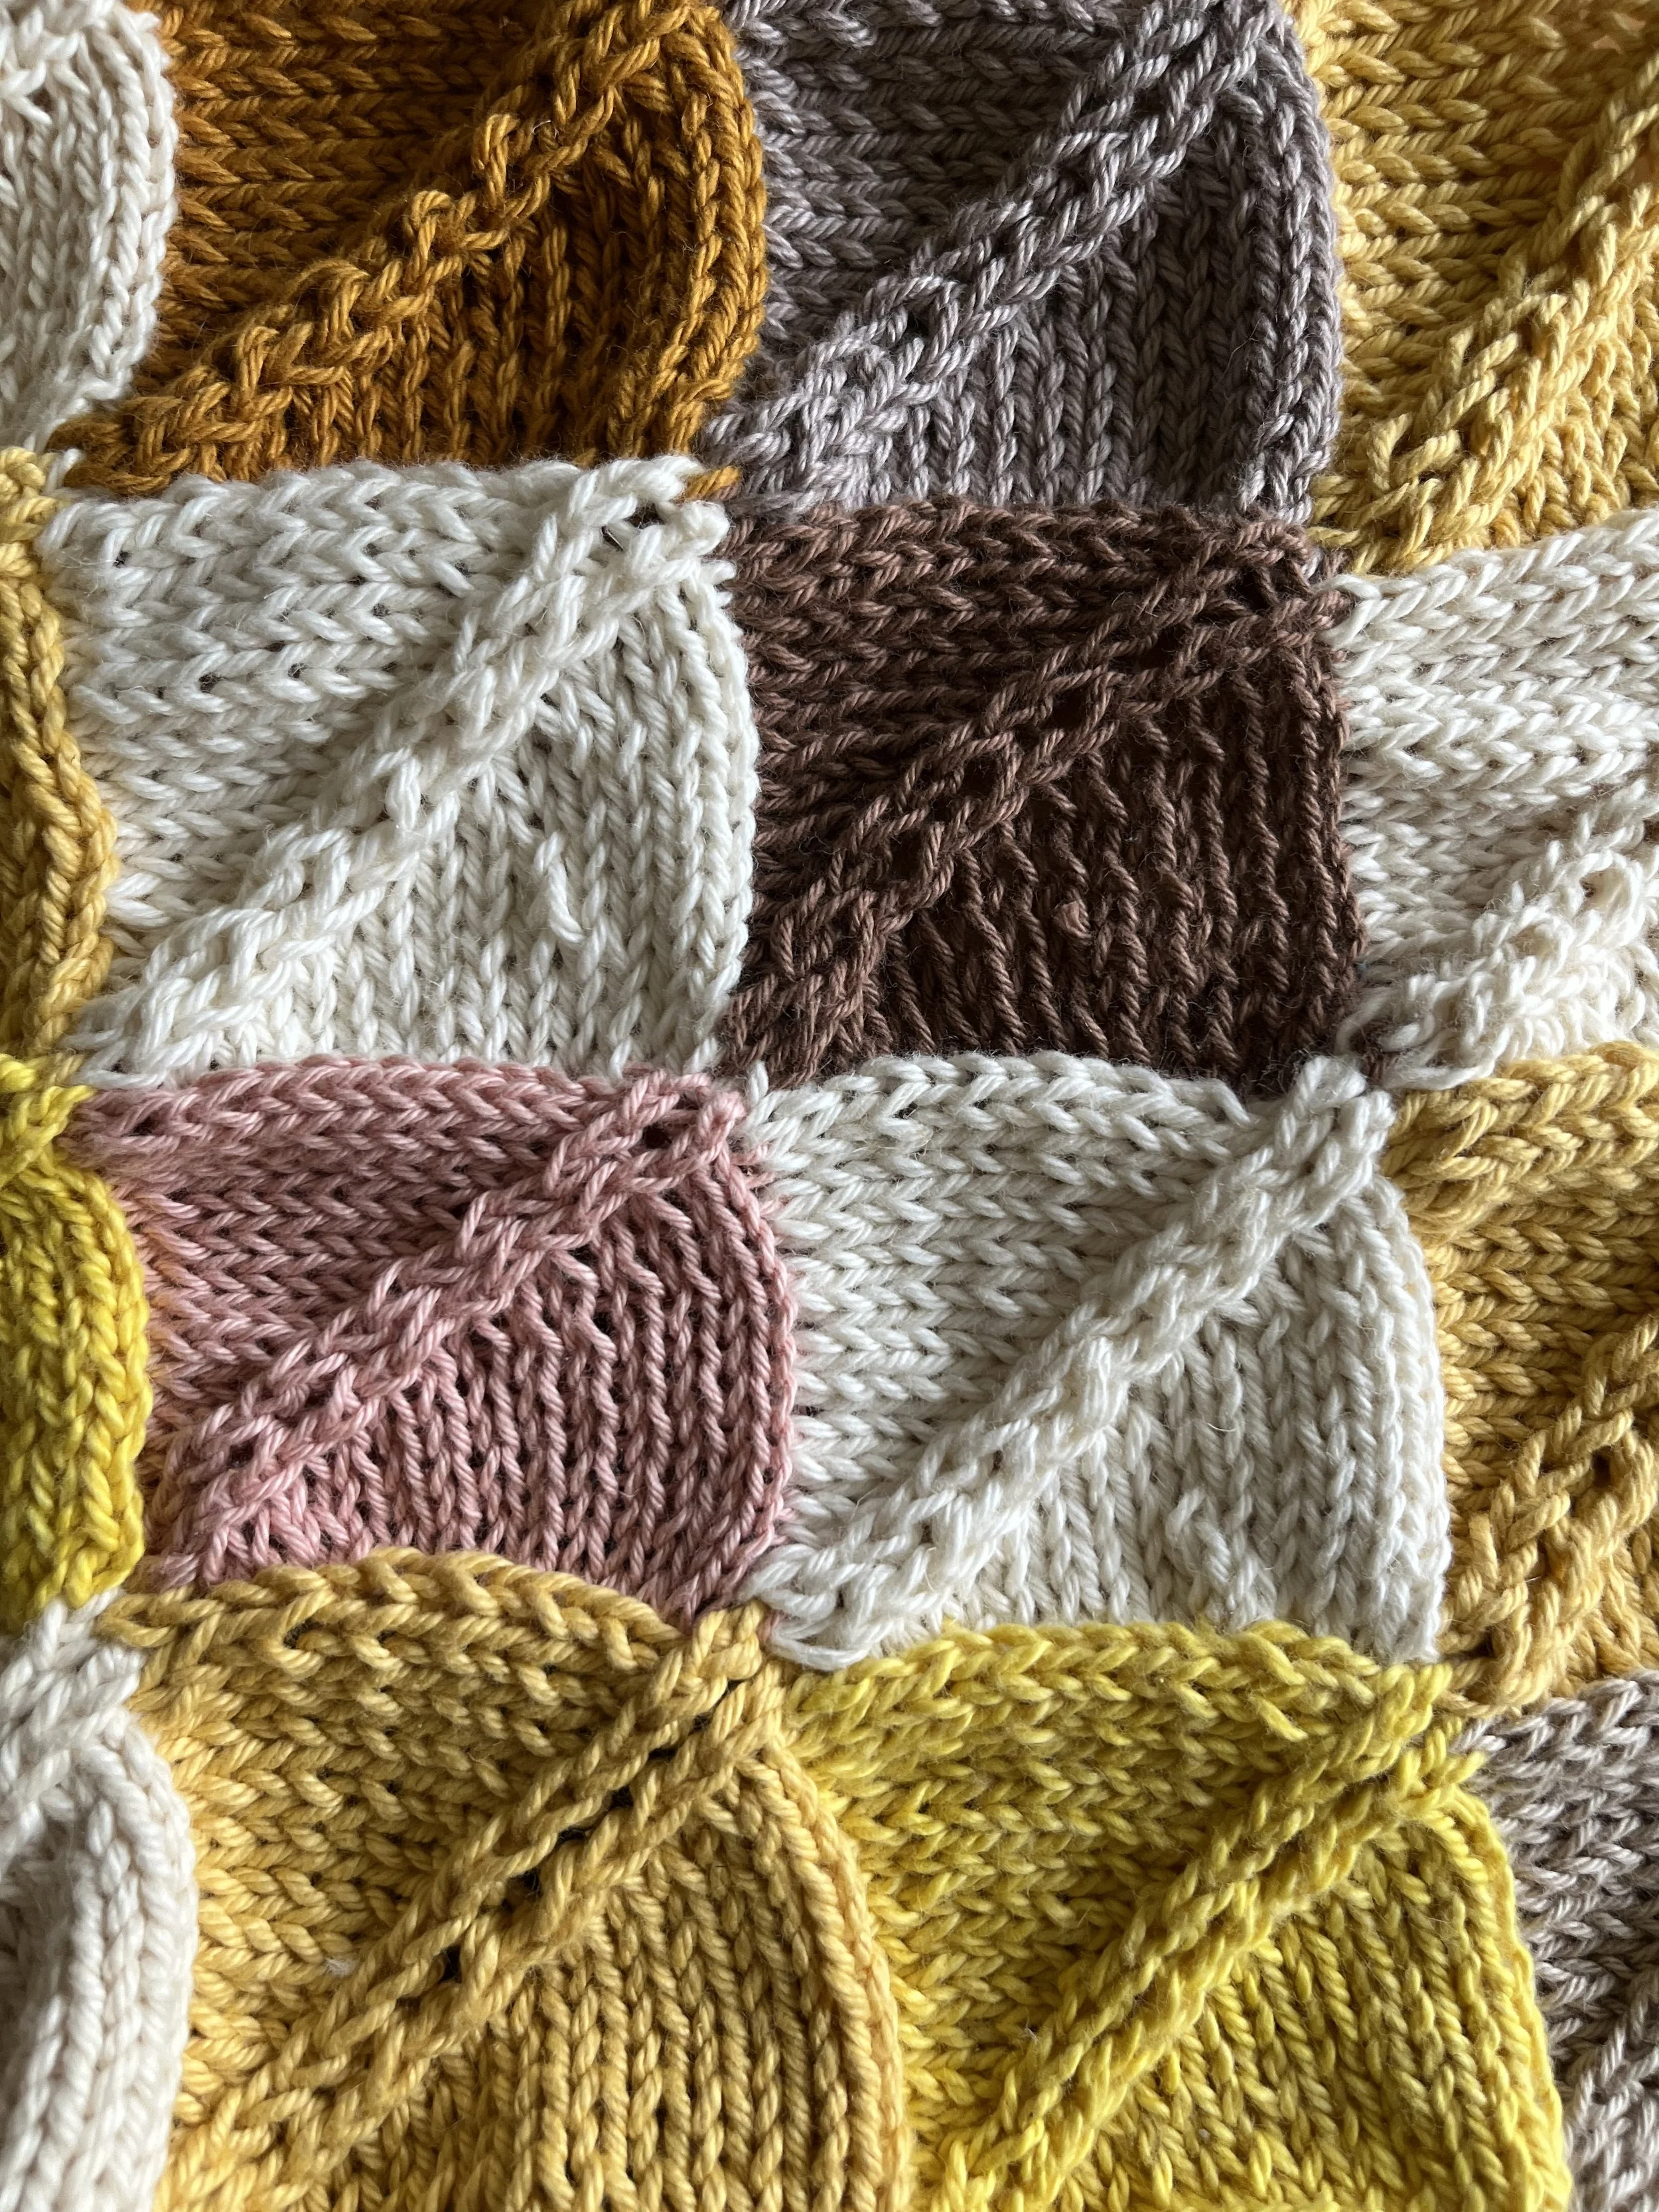
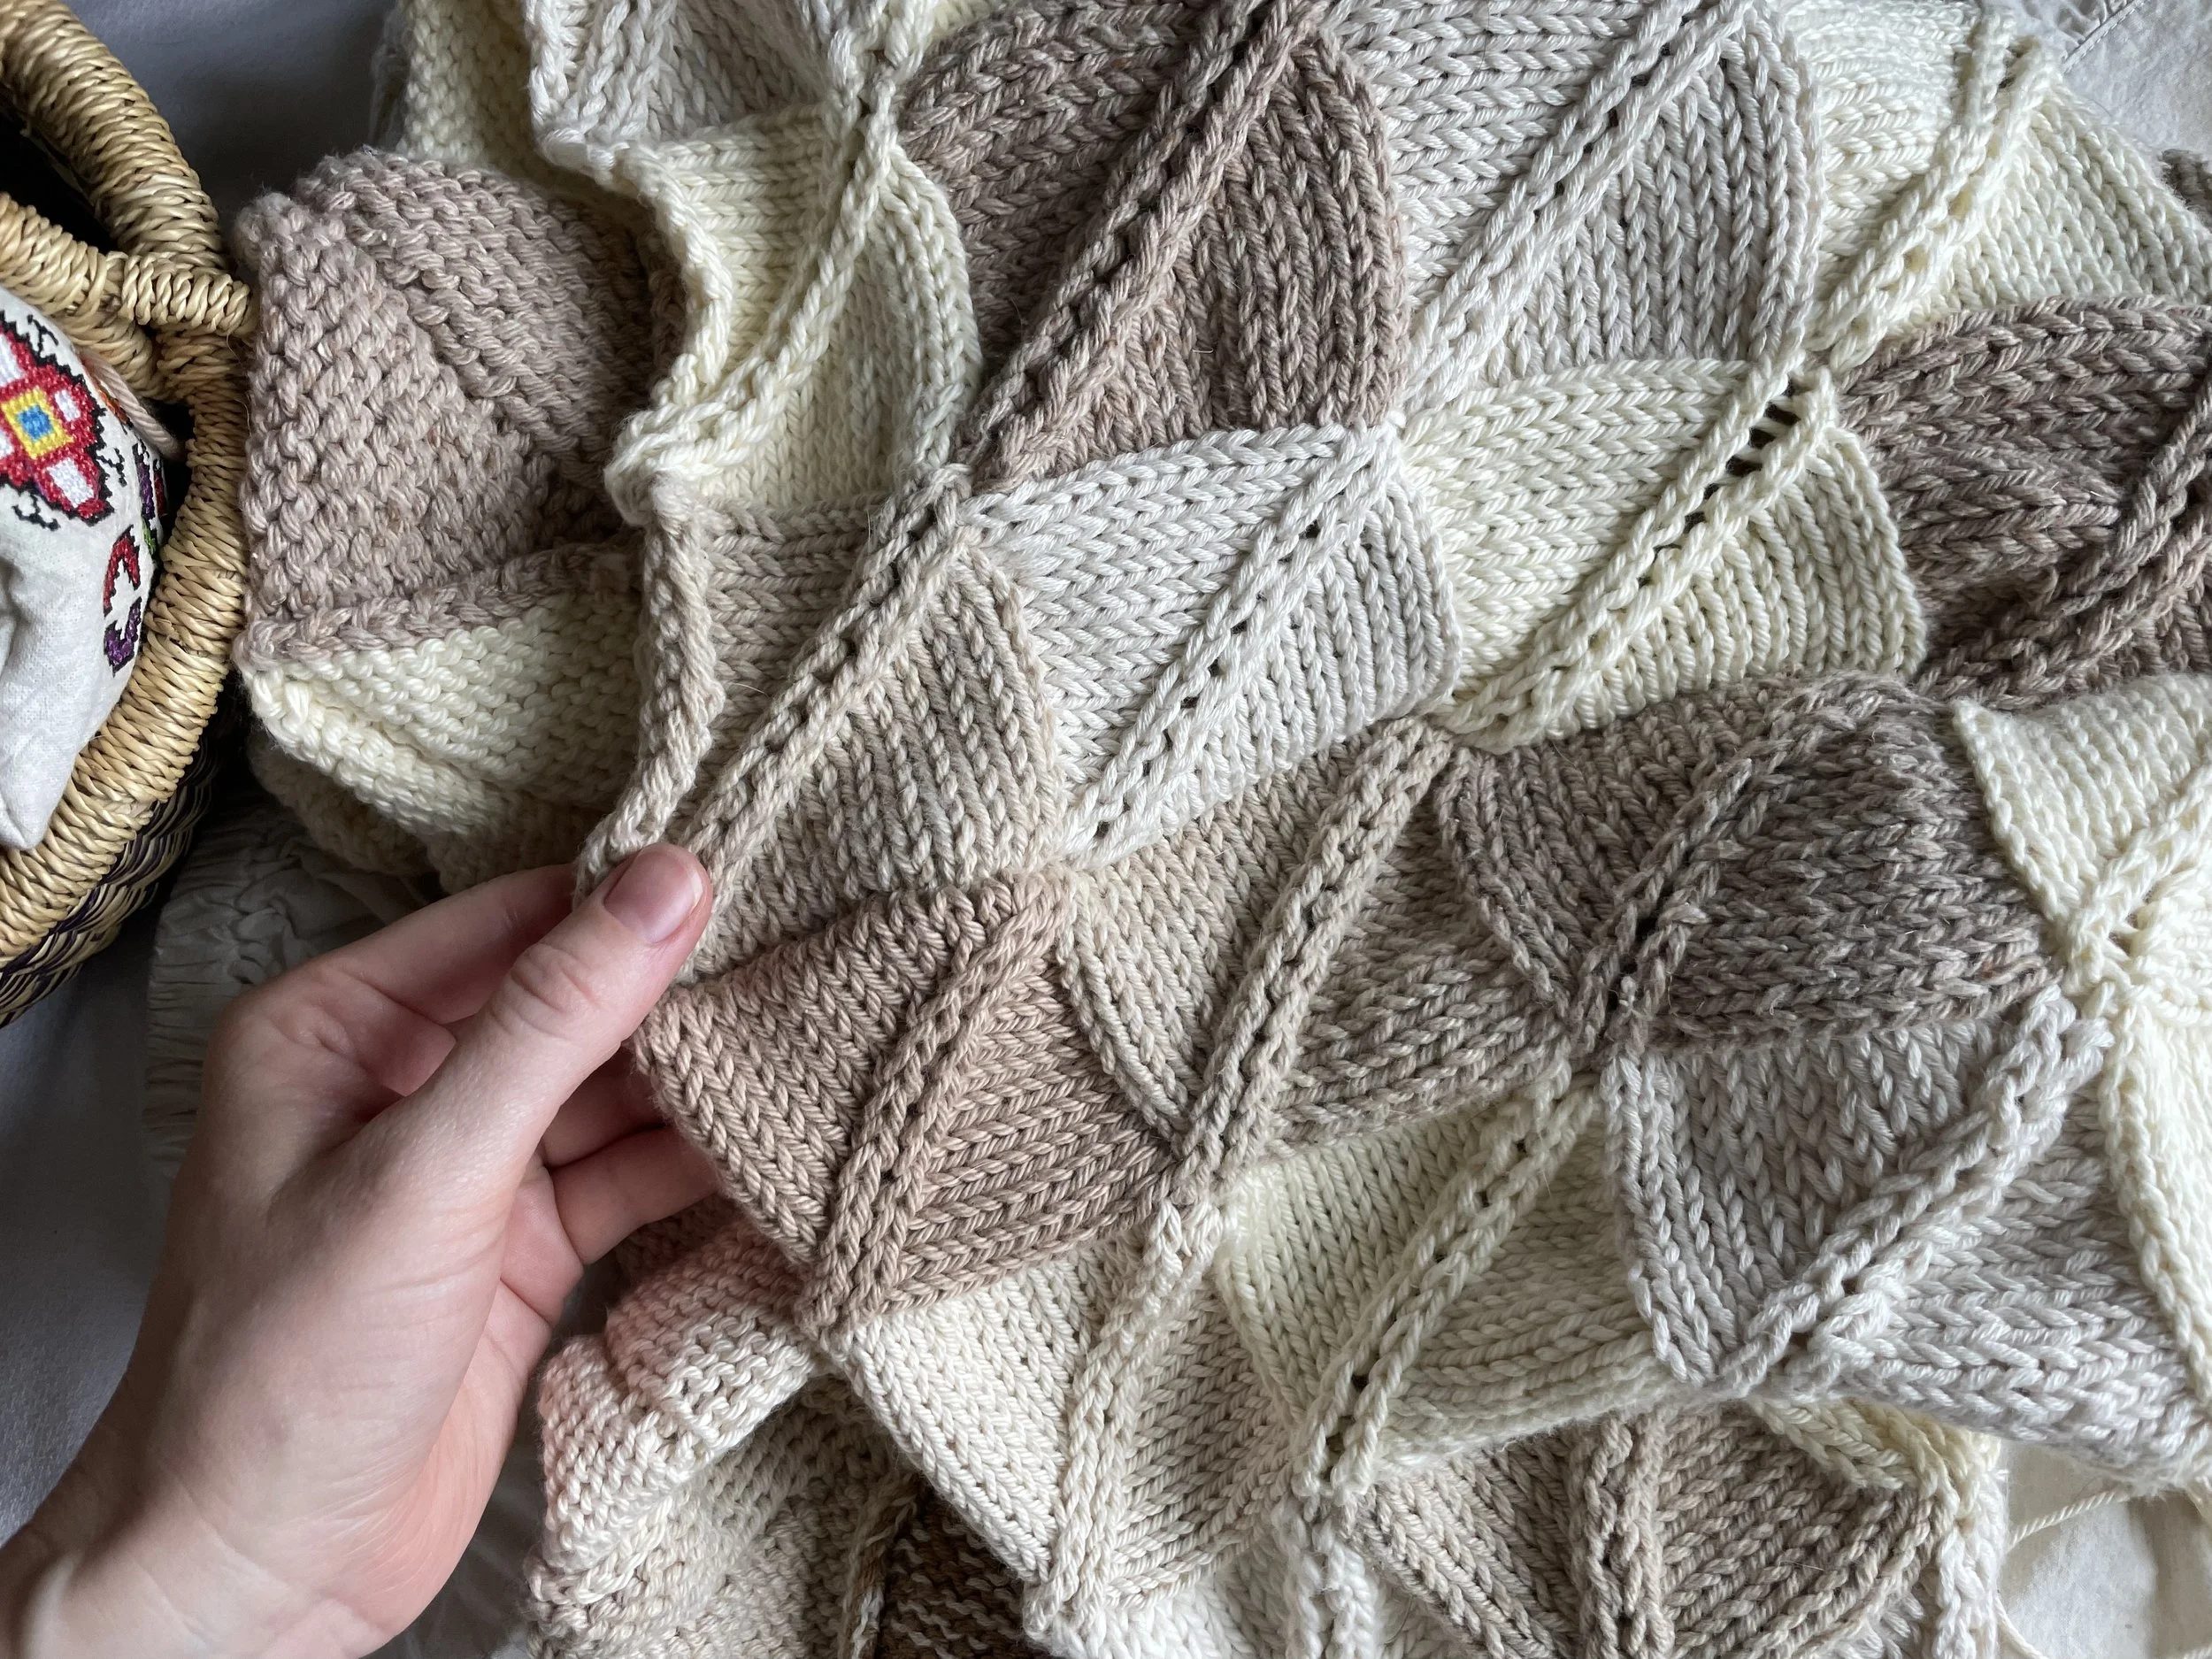
The Filtered Light Pullover is knit in a patchwork construction. It’s a really fun and thrifty way to use yarn scraps you have stashed from previous projects.
Color coordinate for a monotone theme, make a checkerboard, or go full kaleidoscope.
Throughout this workshop, you’ll also see “Off-Ramps” - these are little recommendations for transforming your project into something else, if life gets busy and you need to finish up early or are inspired to create something else!
MATERIALS:
Scrap yarn (not cut tails, but leftover skeins and small balls of yarn) & supplementary skeins as needed (worsted weight, but you can also make fingering and heavy worsted work). Approximate total yardage is (400-2000yds).
US5/3.75mm circular needle, 16” & 24” or larger for bottom hem work.
Tip: if you don’t own US5 needles, check your gauge on needles you do have before purchasing new ones!
Stitch marker
Tapestry needle
SIZES:
1 (2, 3, 4, 5)(6, 7, 8, 9, 10)

Sizes 1-3 were written to fit Children. Estimated ages for each fit: Size 1 for a 1-2 year old, Size 2 for a 3-4 year old, Size 3 for a 6-8 year old.
*Recommended sizing is 10-15” of positive ease for Adults and 5-10” for a child. As a person with a 35” chest circumference, I made a Size 6.
Abbreviations:
k = knit
p = purl
sm = slip the marker
P2tbl = Purl 2 together through back loop
P2tog = purl 2 together
K2tog = knit 2 together
Ssk = slip next two stitches onto the right needle, knit wise, then slide them back to the left needle and knit them together.
Troubleshooting:
Problem: decrease lean is facing a different direction on my patch.
Solution: you didn’t pick up your stitches in the right order or on the correct edge of the foundation patch. Take that patch apart and start over.
Problem: the decrease stitches look twisted.
Solution: You might not be using the correct decrease stitch. Make sure you are purling through the back loops when instructed to and working the ssk correctly.
INSTRUCTIONS:
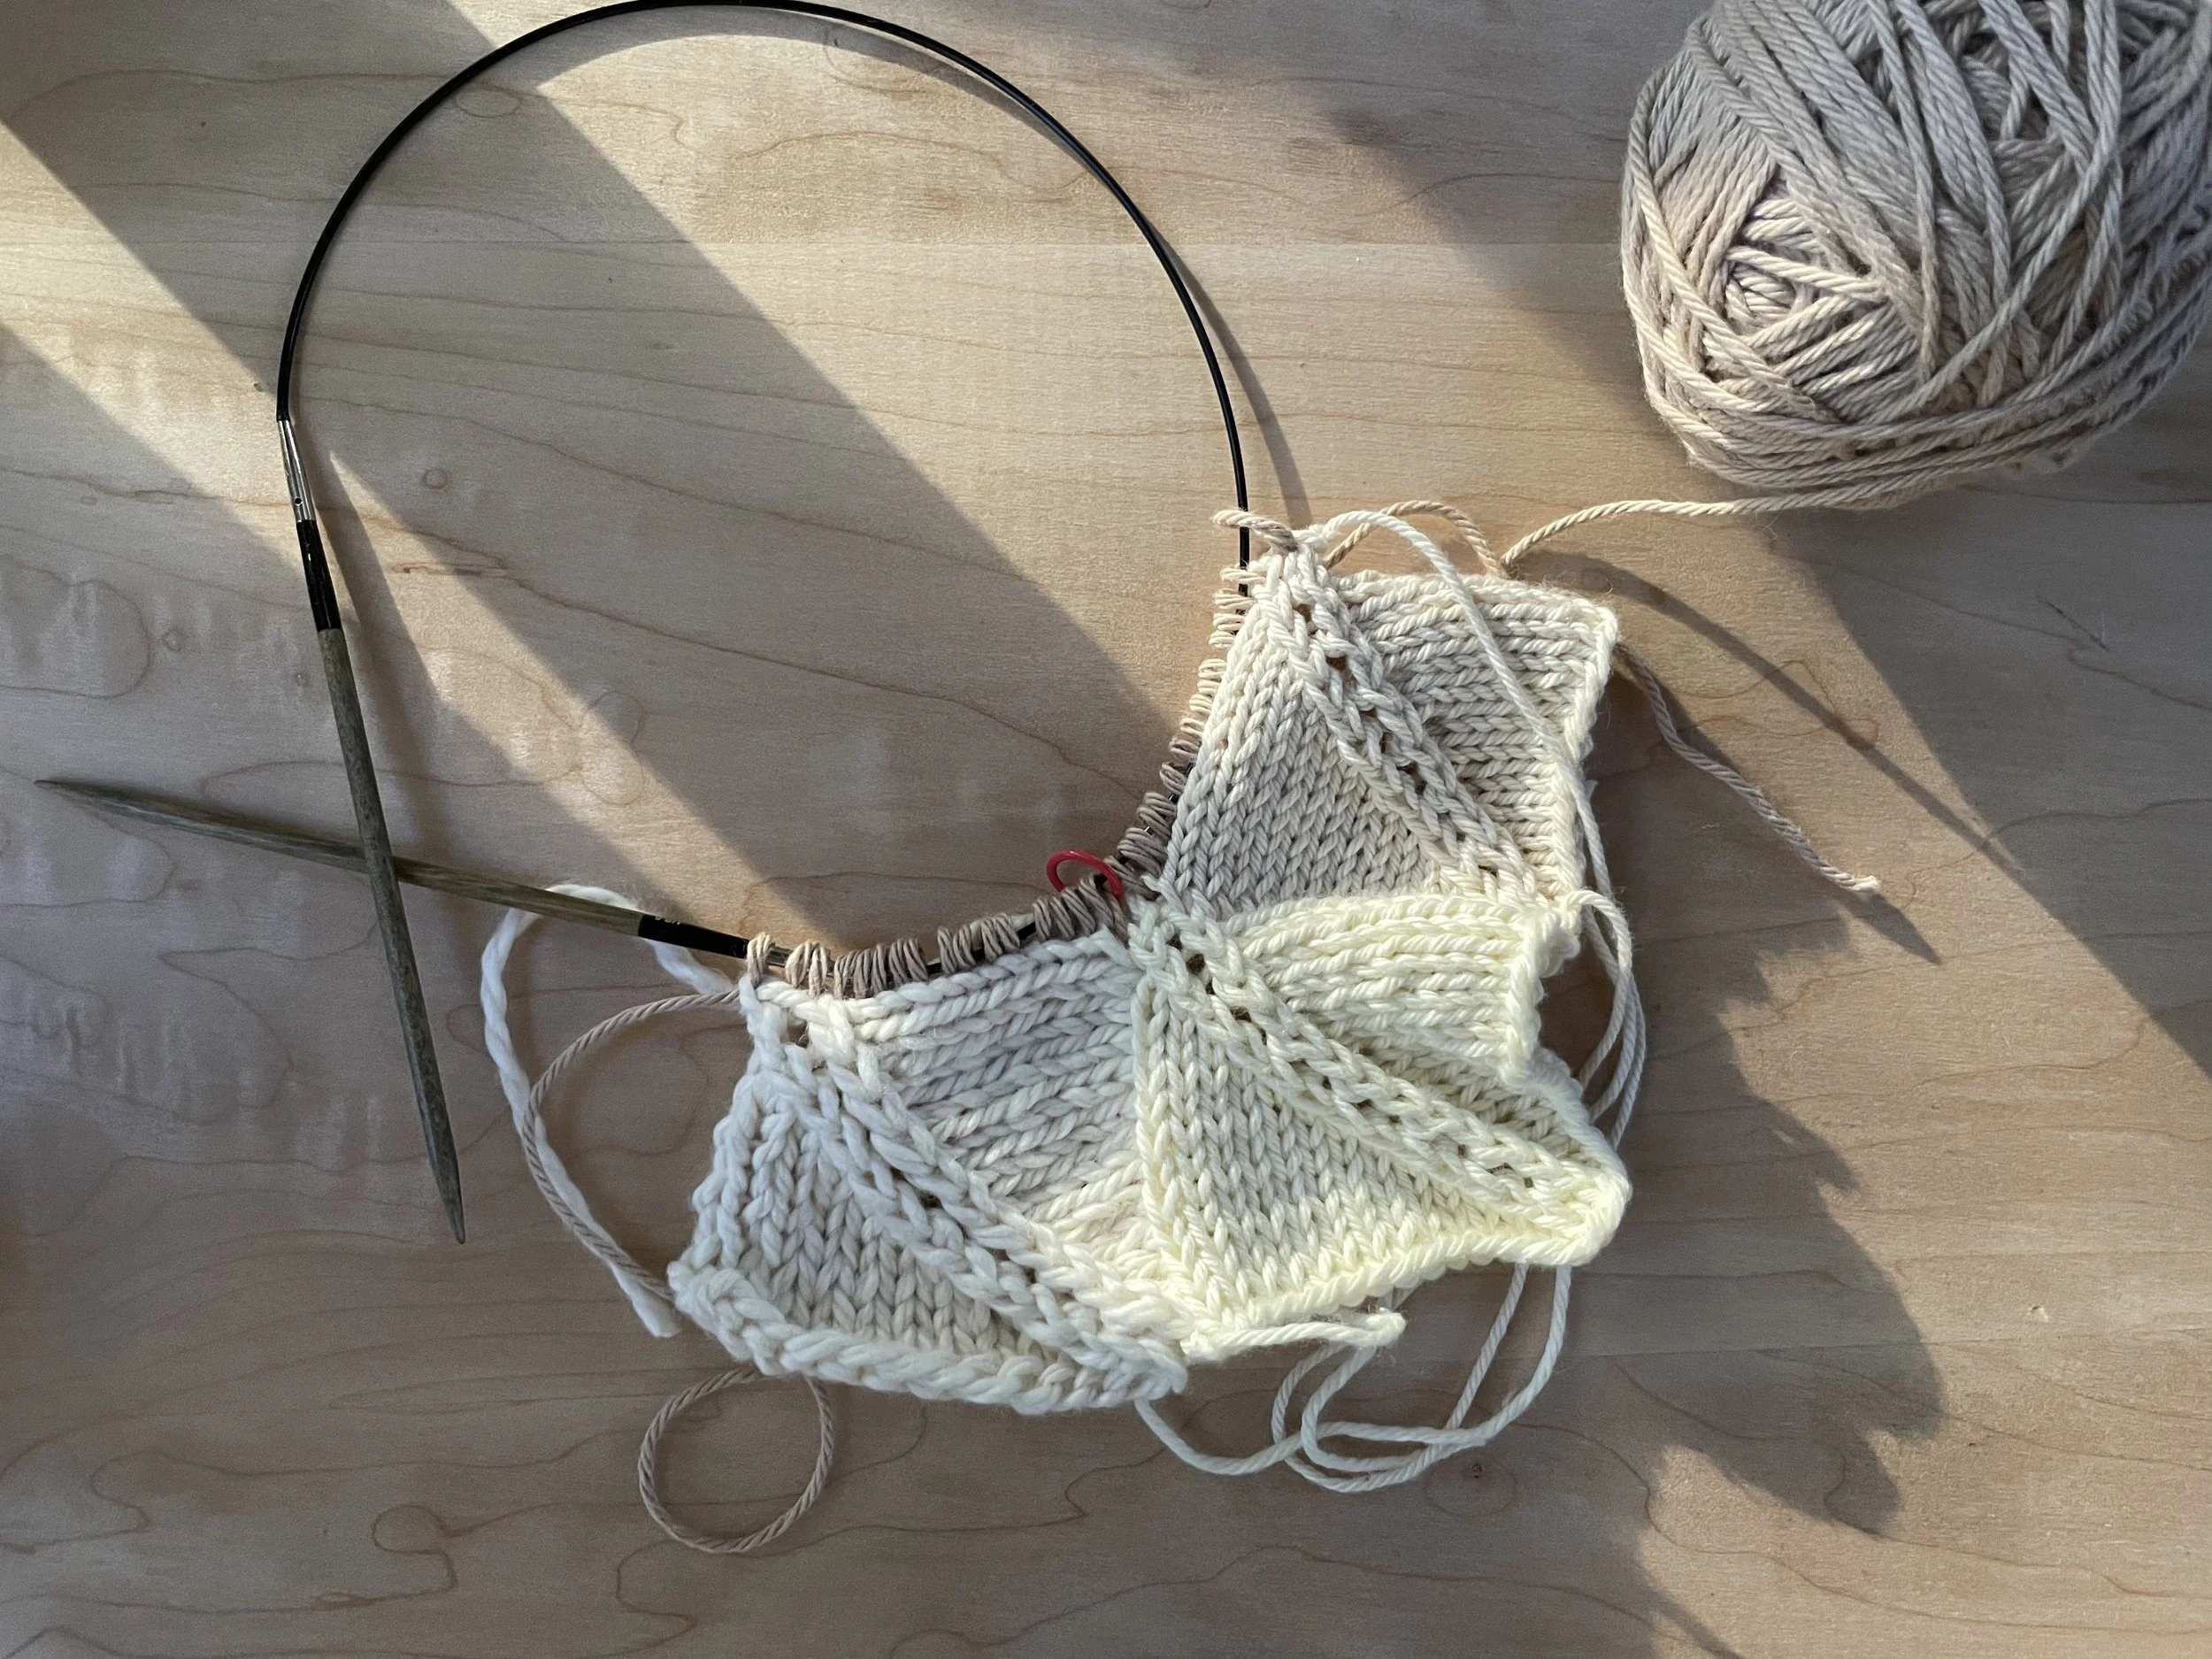
First things first: we’re making a gauge swatch. There is a recommended gauge for this pattern, but this is also a scrap yarn project - so gauge may be quite variable.
Follow the guidelines below or watch the video for a step by step walk through!
First patch
Cast on 16, pm, cast on 16.
Row 1 (WS): Purl to 2 stitches before m, p2tbl, sm, p2tog, purl to end.
Row 2 (RS): knit to 2 stitches before m, k2tog, sm, ssk, knit to end.
Repeat the above two rows until 2 stitches remain, k2tog. Snip tail and thread it through the one remaining stitch to cast off.
Second patch
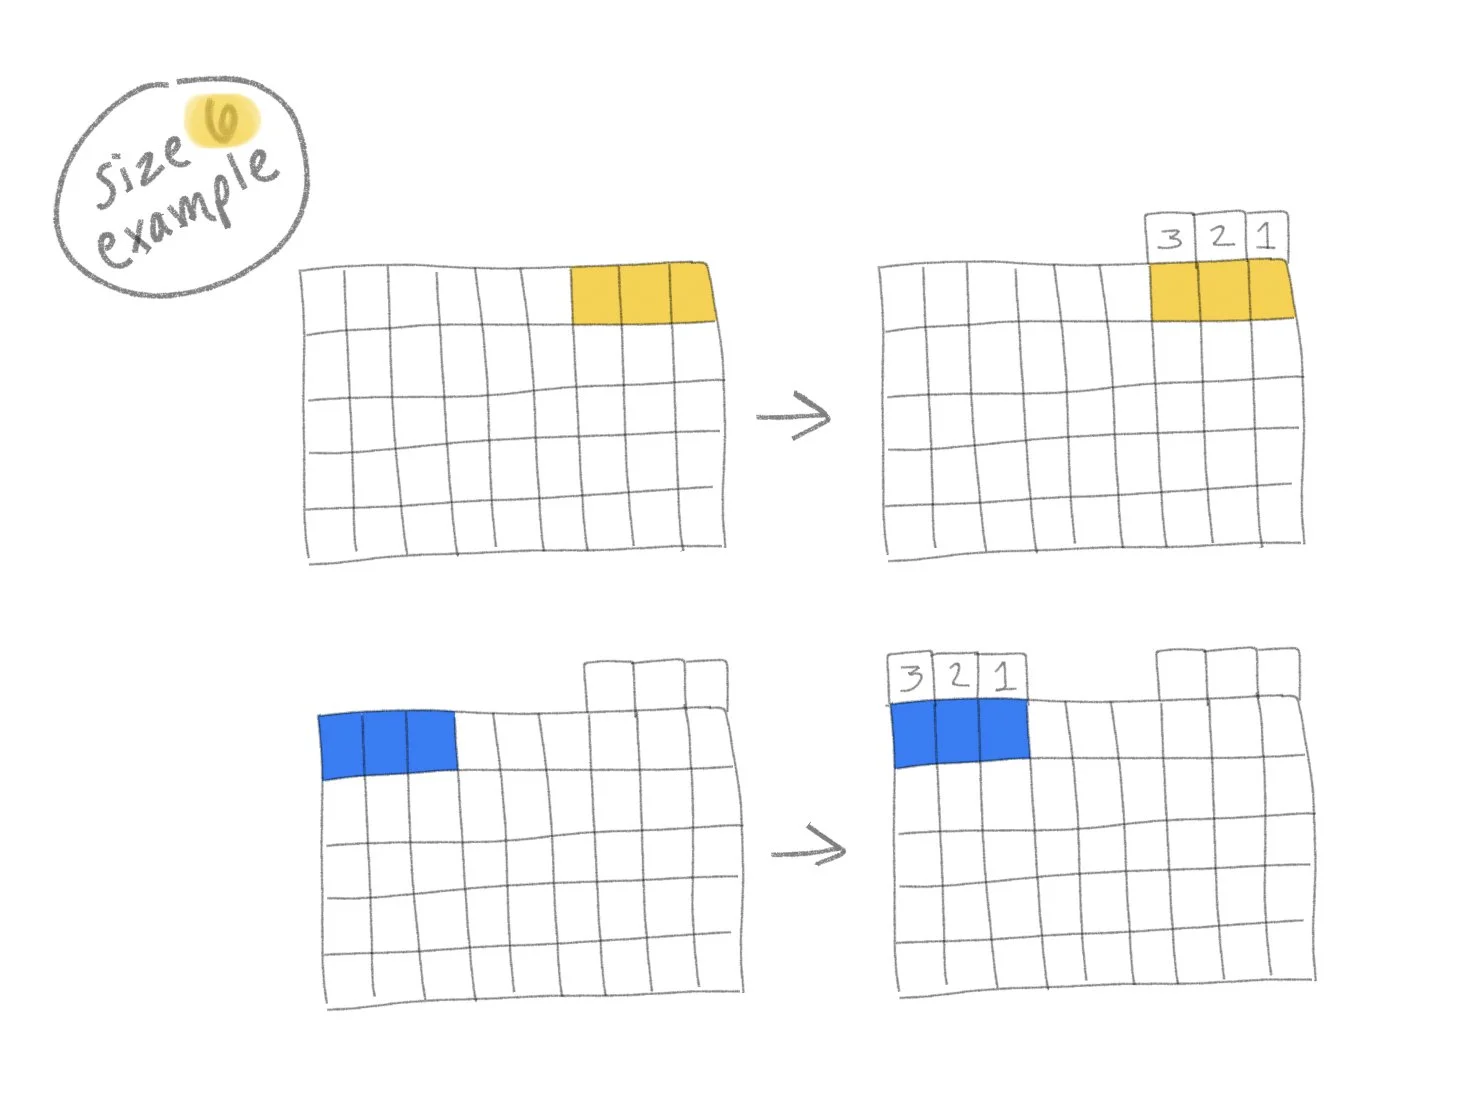
This patch will be placed on top of your original patch.
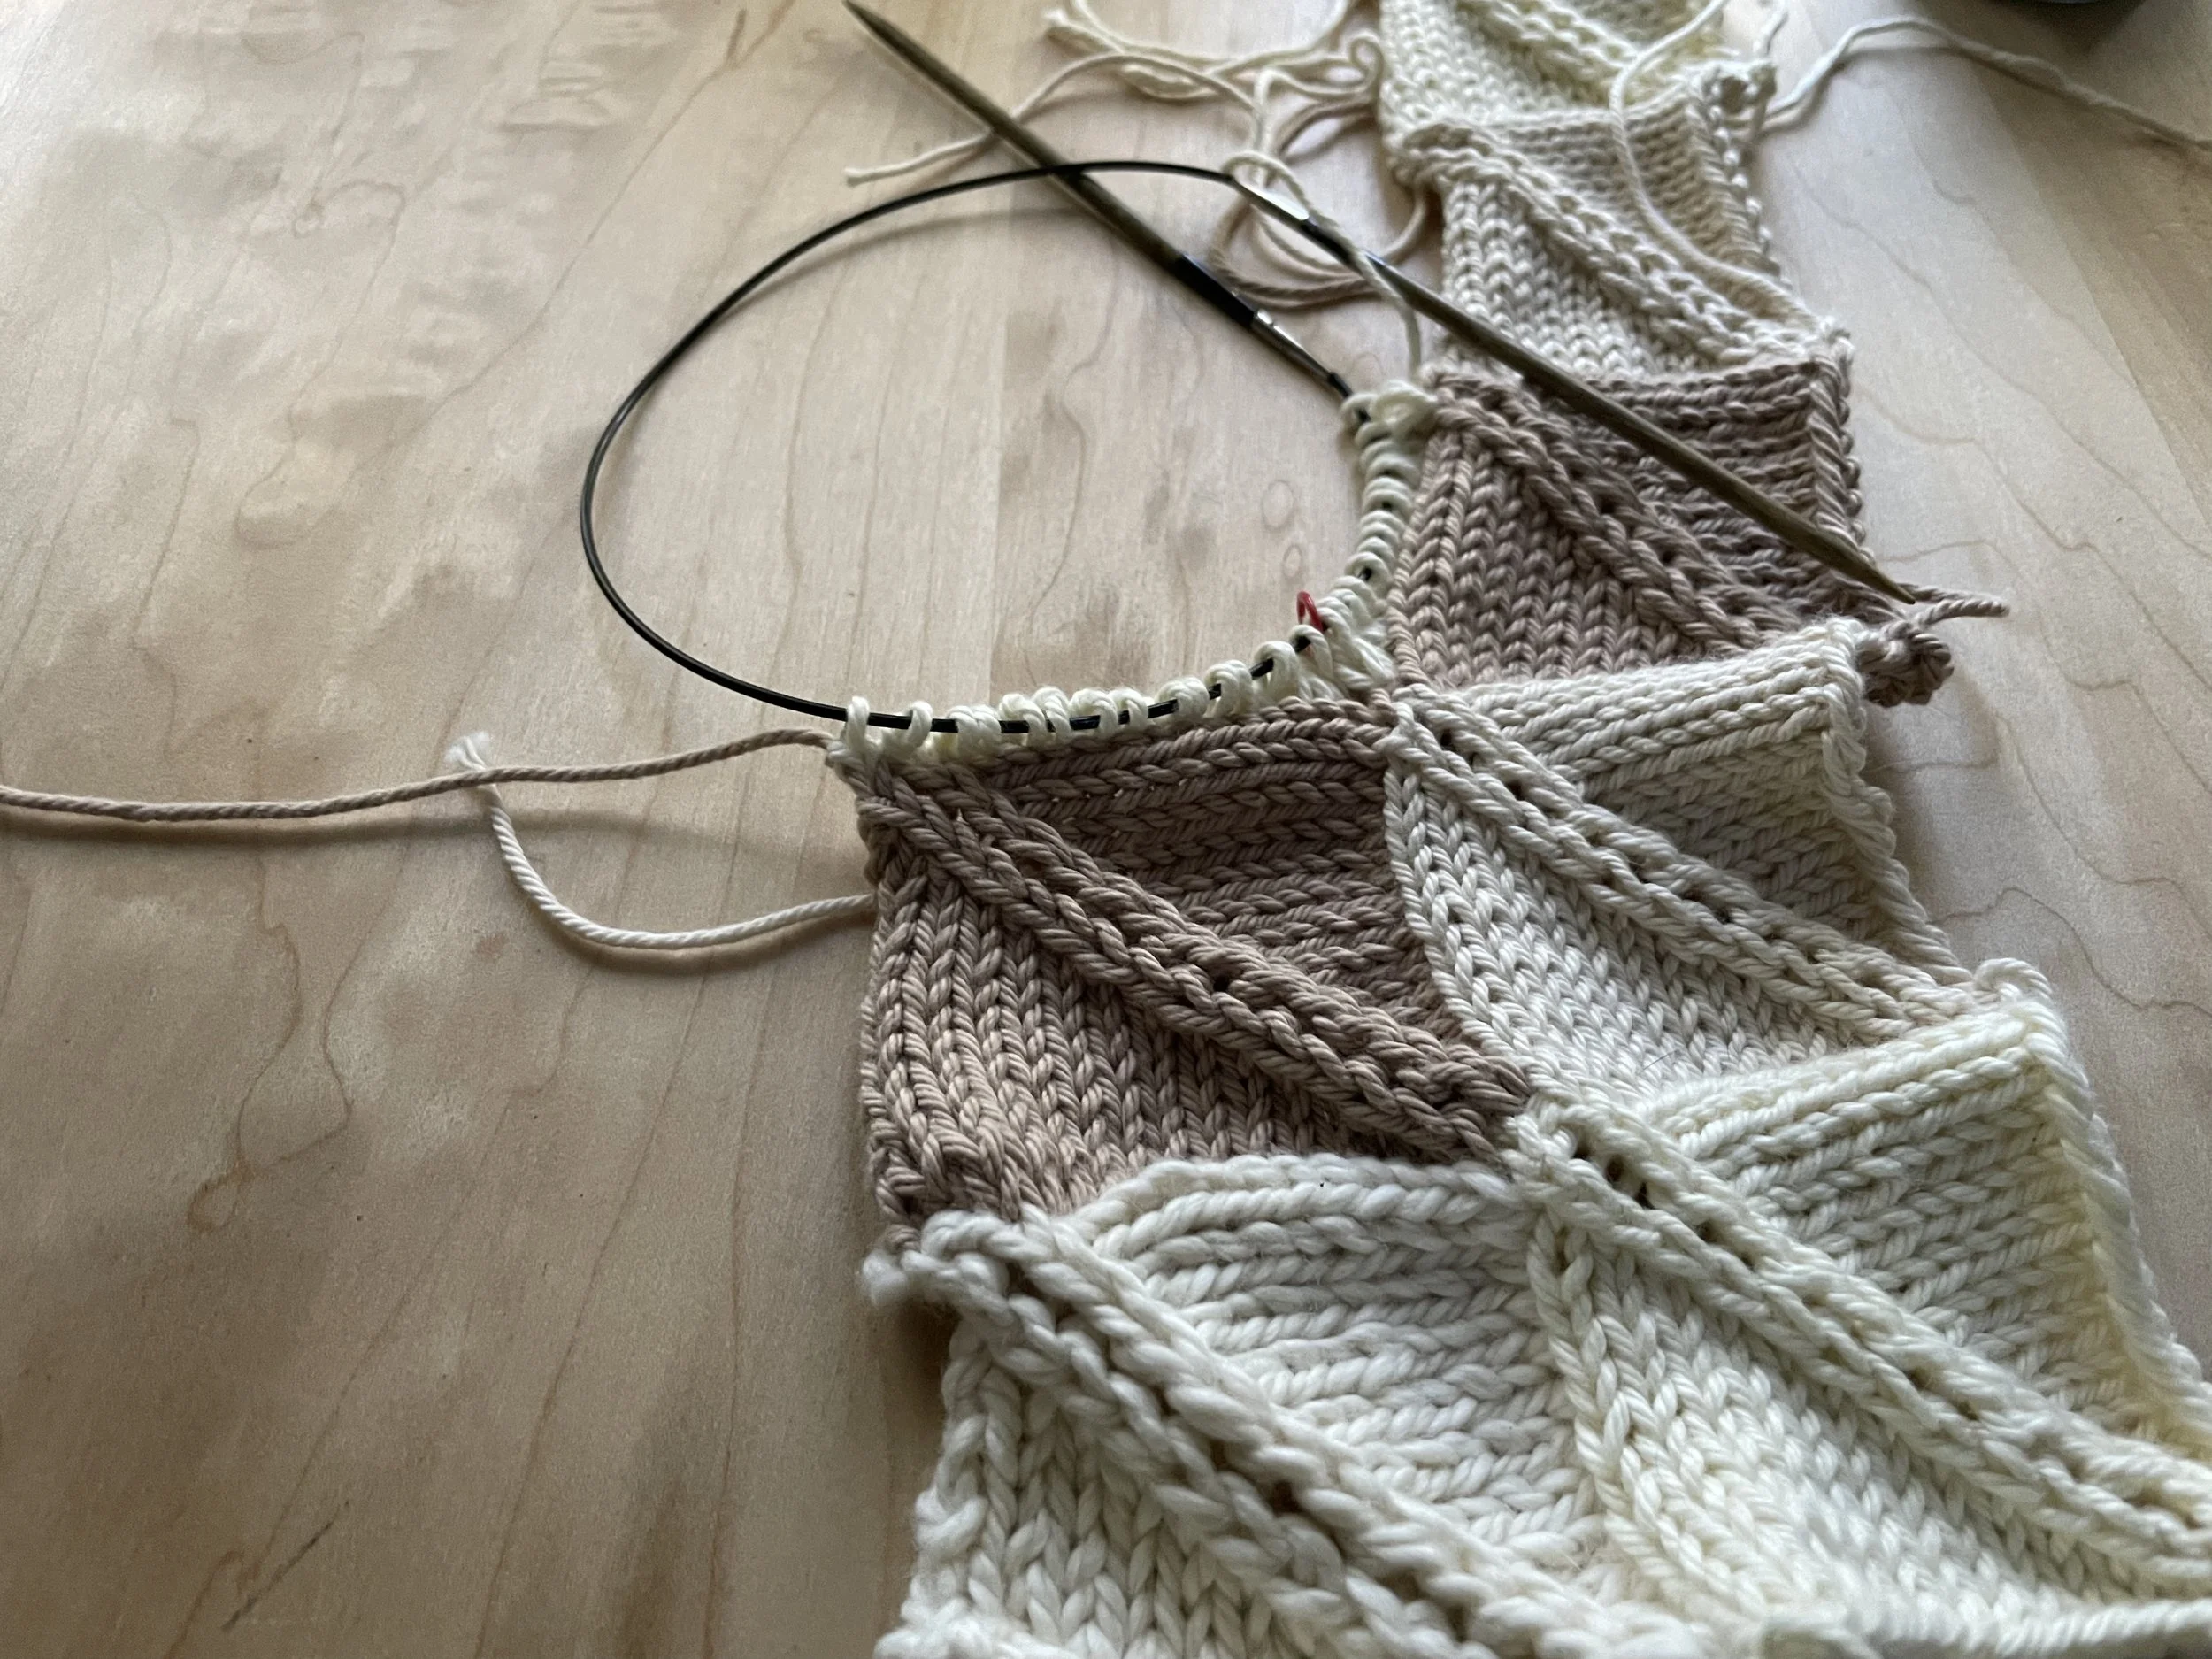
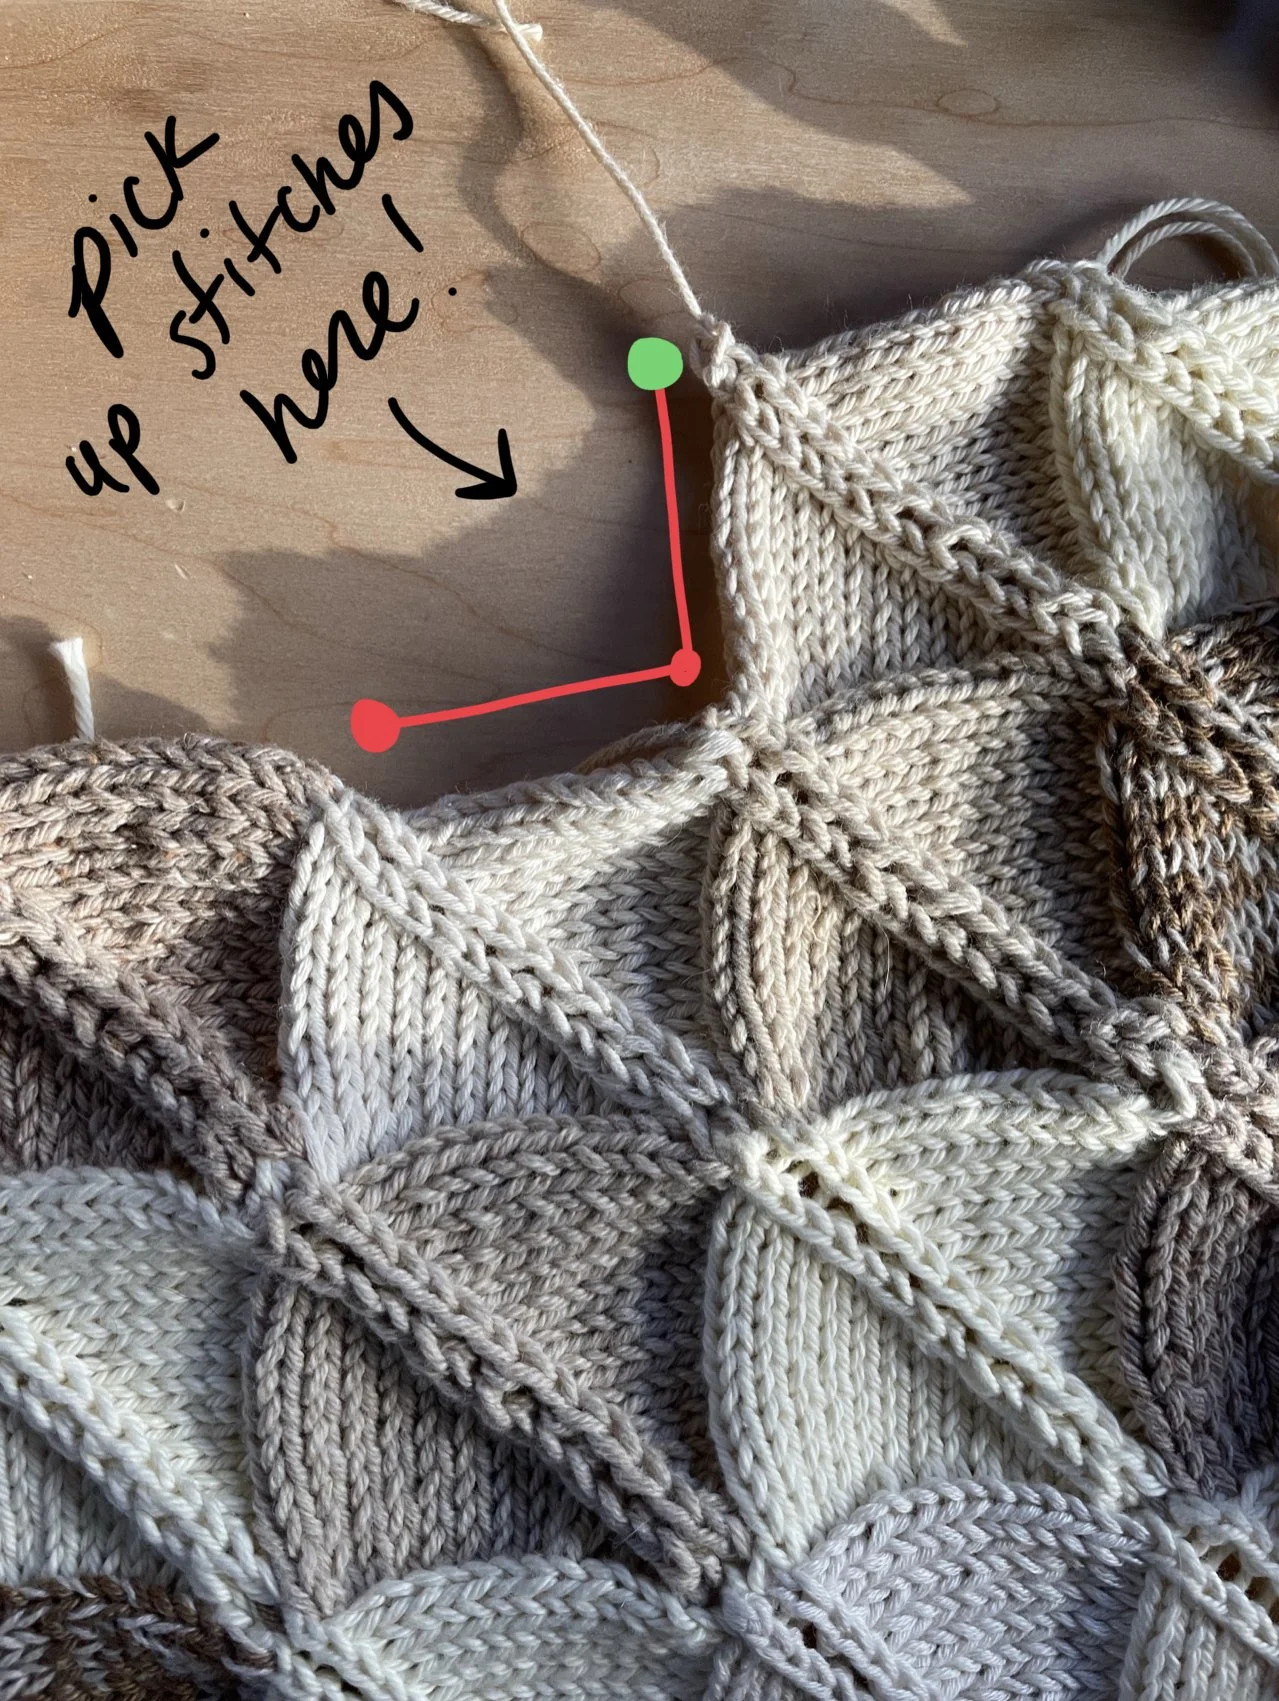
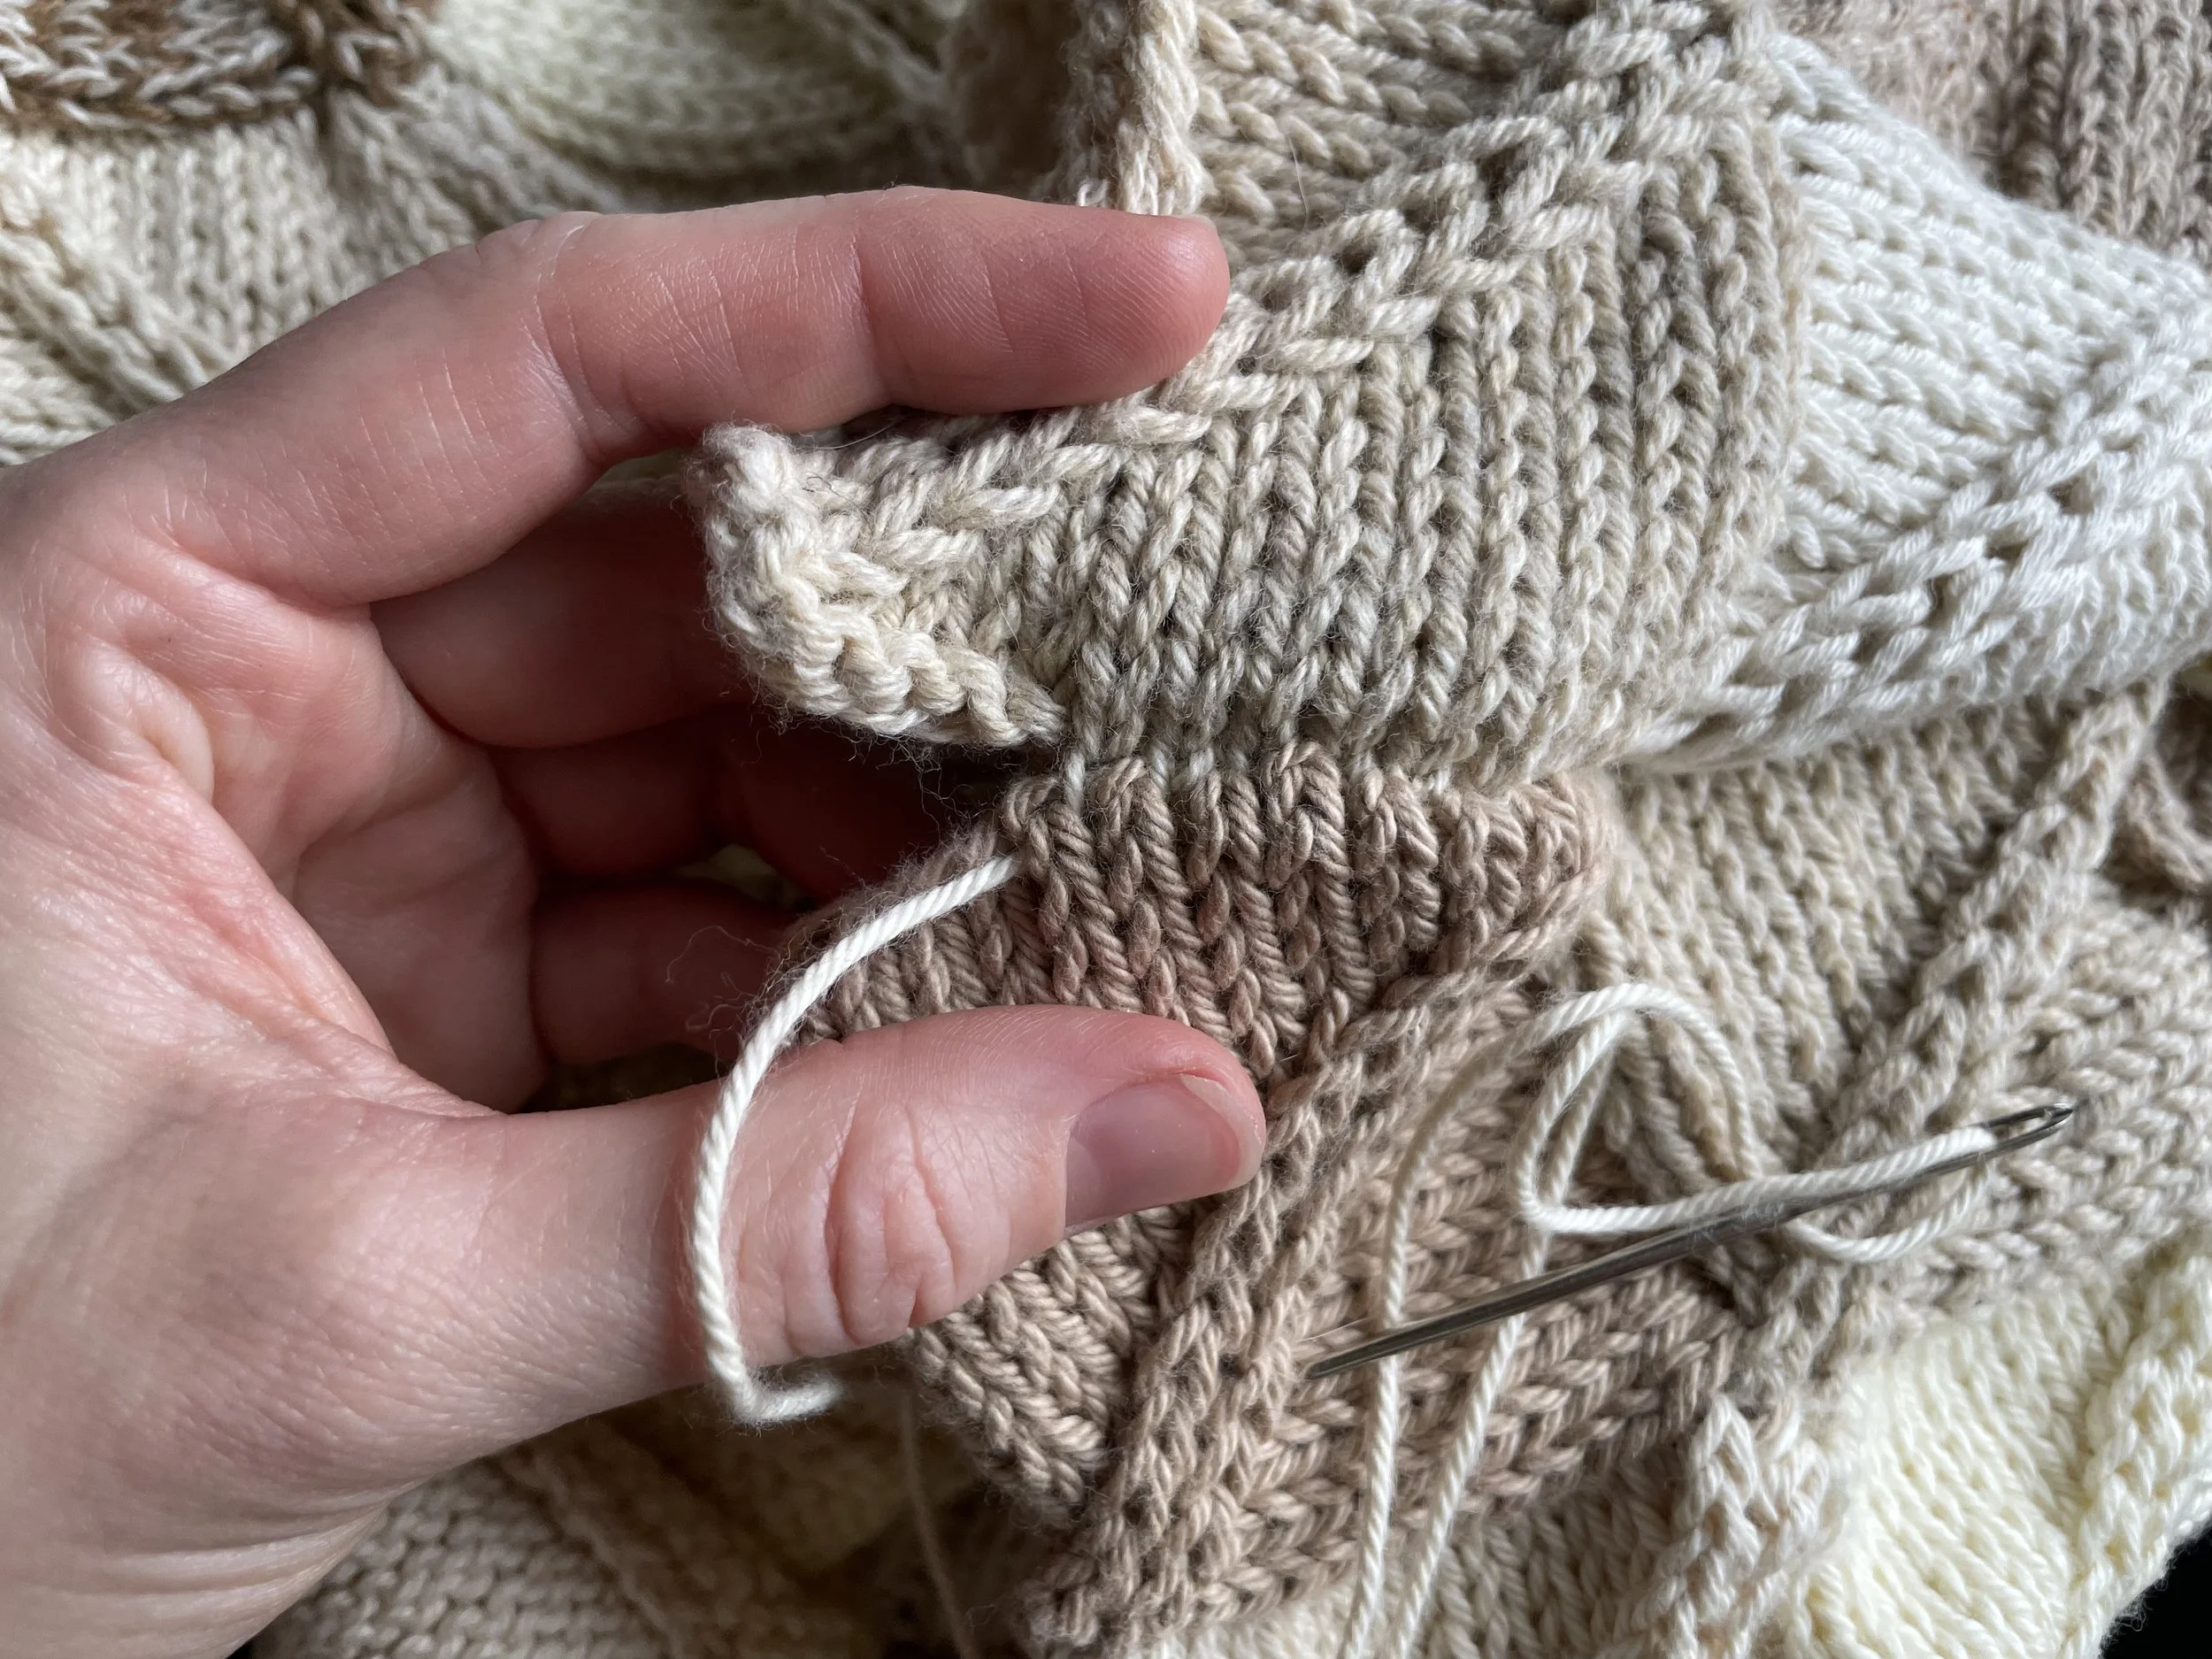
First, cast on 16 stitches, pm, then with the right side of the original patch facing you, pick up 16 stitches along the TOP side. See images below.
Work this patch in the same manner you did the first. The decrease slants of each patch should lean in the same direction - towards the left.
Third patch
This patch will be placed to the left of your original patch.
First, with the right side of the work facing you, pick up 16 stitches along the LEFT side of the original patch, pm, cast on 16 stitches using backwards loop method.
Work the patch as described above.
Fourth patch
This patch will be worked in the remaining empty corner. To the left of the Second Patch and on top of the Third Patch.
First, with the right side of the work facing you, pick up 16 stitches along the LEFT of the Second patch, pm, pick up 16 stitches along the TOP of the Third patch.
Work the patch.

Second Patch Cast On
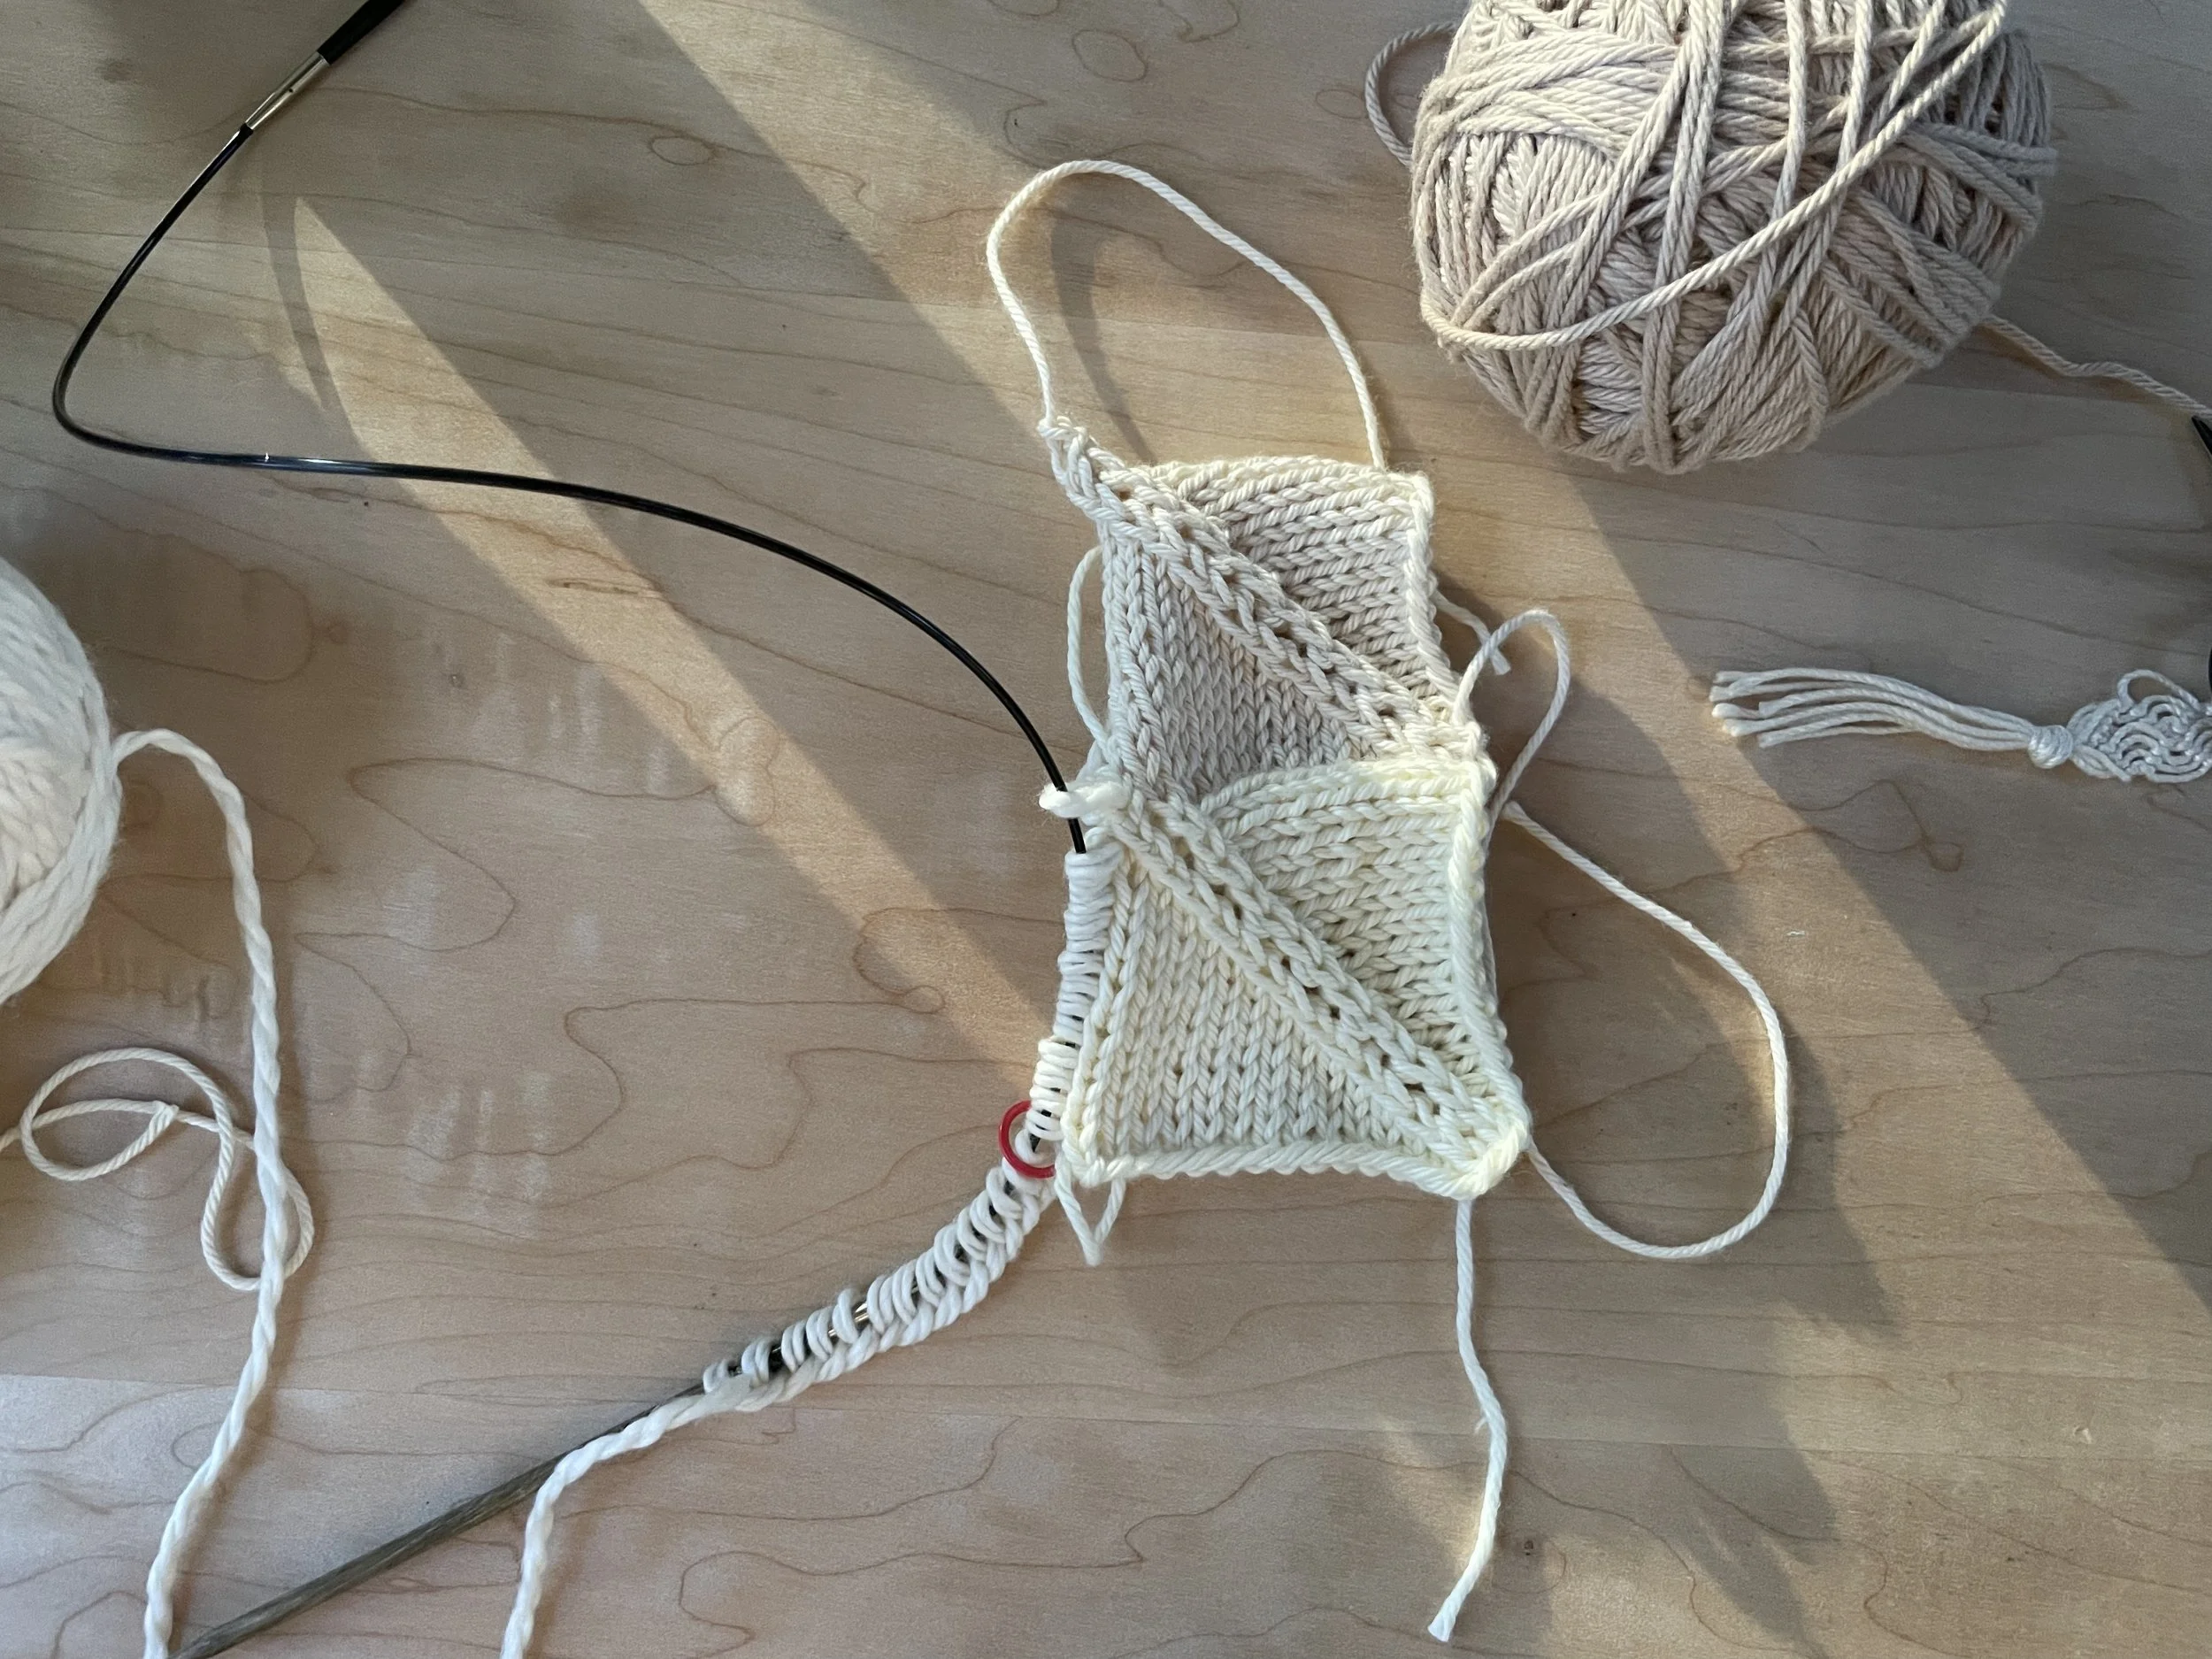
Third Patch Cast On
Fourth Patch Cast On
A set of 4 attached squares should measure approximately 5.5” wide x 5” tall after blocking. Blocking is recommended since this stitch pattern tends to pucker right off the needles!
If your gauge swatch is smaller, you can go up a needle size or two .
If your gauge swatch is larger, you can go down a needle size or two.
If you’re happy with your gauge even though it’s different than the recommended, you can figure out the size of project it will yield with some simple math:
Example: your gauge swatch measures 4.5” wide. The recommended gauge is 5.5” wide.
4.5 / 5.5 = 0.81
Multiple 0.81 with any of the sizes to find out how large your wearable will be with your current gauge.
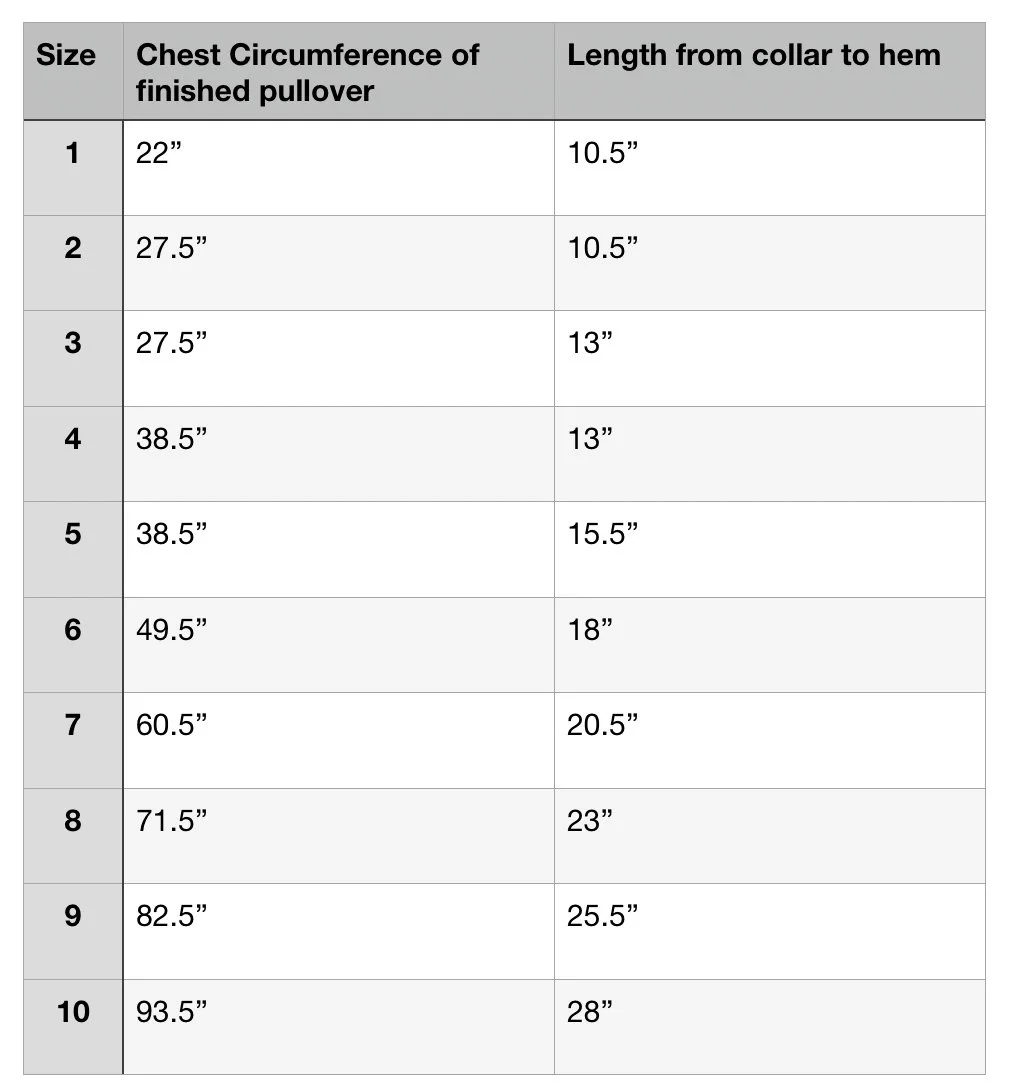
Example: Size 7 has a circumference of 60.5”.
60.5 x 0.81 = 49”
If you used that smaller gauge to make a Size 7, it would likely come out with a 49” circumference, instead of 60.5” !
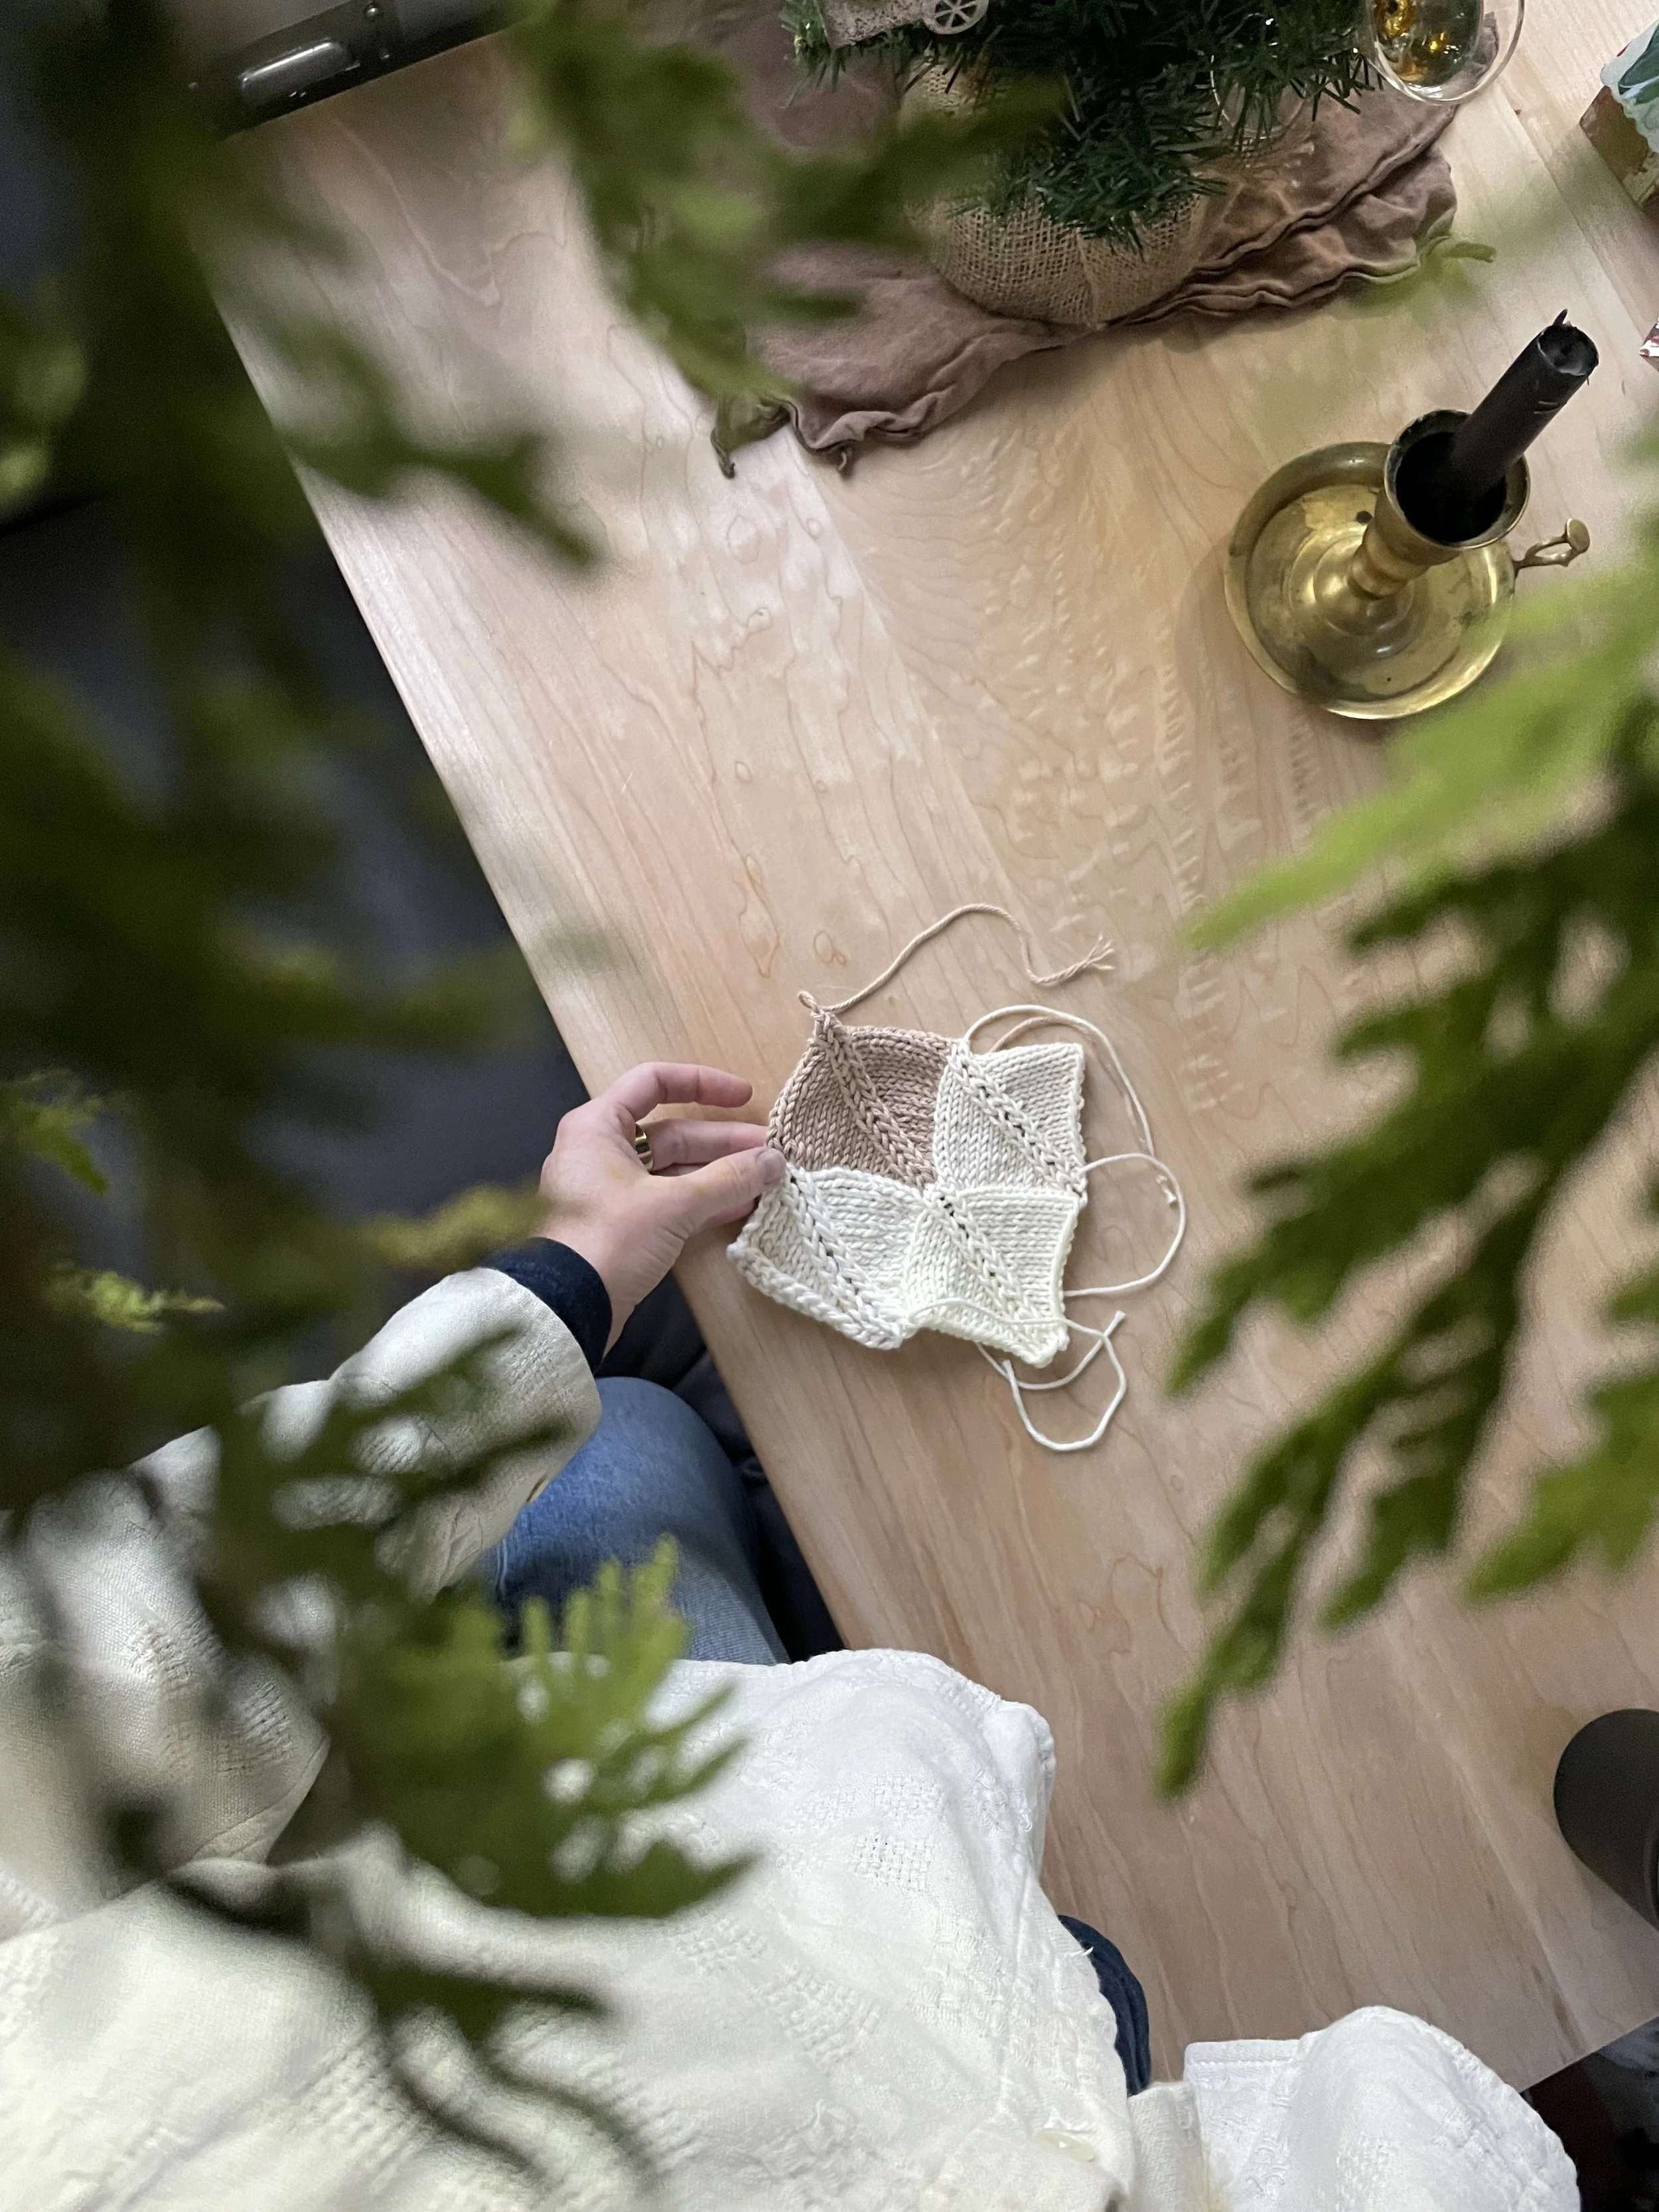
Off Ramp: If you need to slide out of this project early, you can transform your gauge swatch into a pincushion or bean bag by crafting another 4 patch square and seaming the edges together. Or, just leave it as is and hang it on your holiday tree :)
Carrying on!
You’re going to use the basic construction methods you learned while making your gauge swatch to create your first panel - a large patchwork rectangle.
Be mindful of the direction your project is oriented in (i.e. what side is up!) & make sure all of your patches are in the same position - with the decrease slants leaning to the left.
See the video below of how to use your gauge swatch as a foundation to build your panel columns.
BACK PANEL:
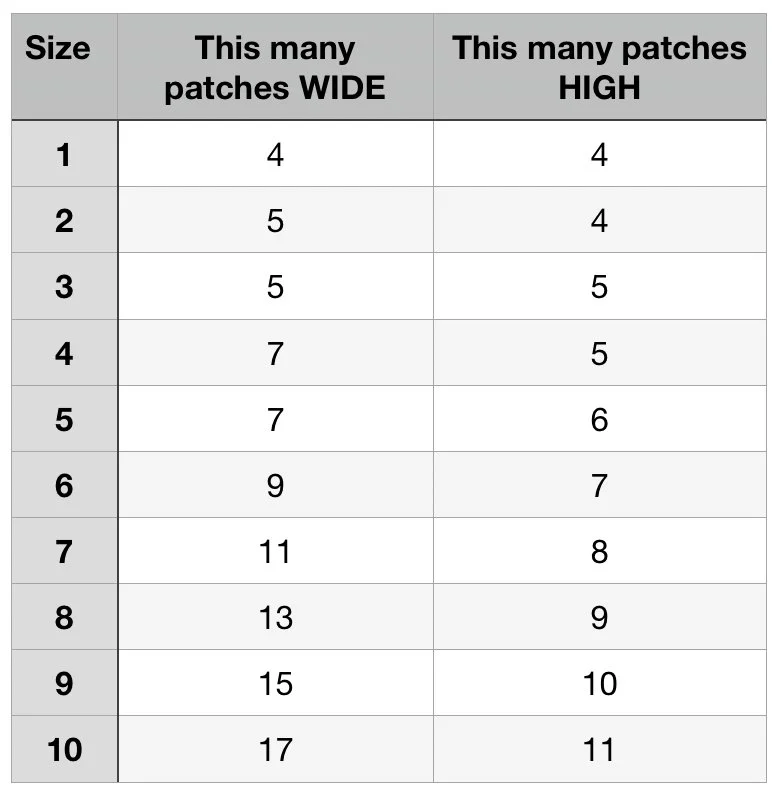
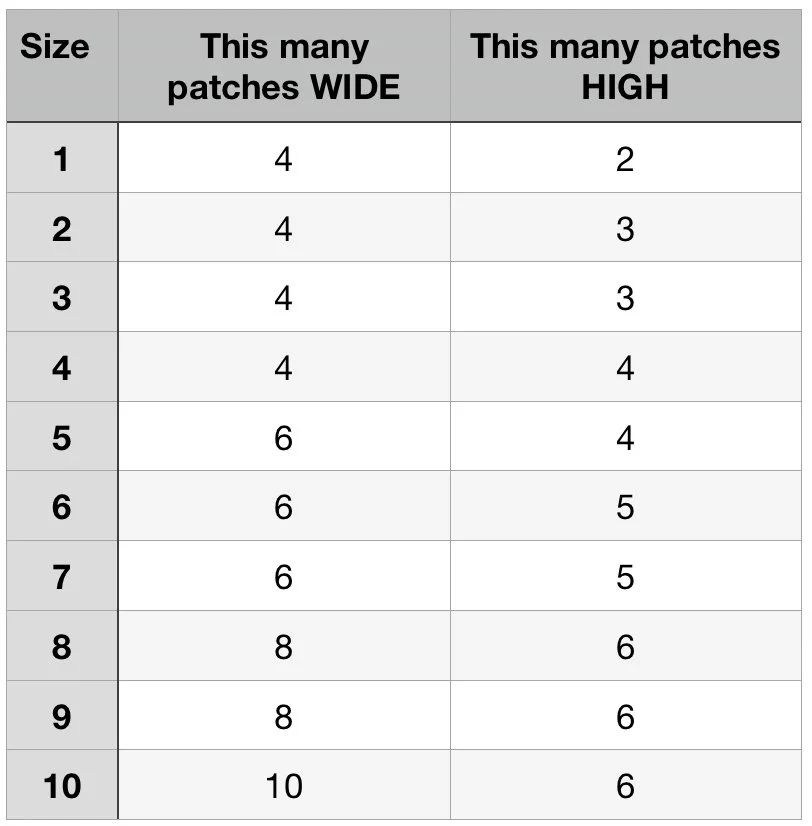
Work a patchwork piece with the below measurements (by patches) according to the size you’re crafting. Read on for construction information!
Complete this patchwork in columns!
Make one column, 4 (4, 5, 5, 6)(7, 8, 9, 10, 11) patches high - attaching each subsequent patch on top of the previous (like when you work a Second Patch).
Attach a second column, starting at the bottom of the first & working your way up.
Continue on until you have 4 (5, 5, 7, 7)(9, 11, 13, 15, 17) columns attached.
Construction complete! Set this panel aside.
Off ramp: To change course and finish this project sooner, you could use your large patchwork panel to make a lumbar pillow (seam edges and stuff with cotton fill), a doll quilt (weave in ends and it’s done!), or even wall art (weave in ends or don’t!)
FRONT PANEL:
Work a patchwork piece with the below measurements (by patches) according to the size you’re crafting. You’ll work the front panel in the same method you did for the back panel! The result will be a large rectangle of patch work.
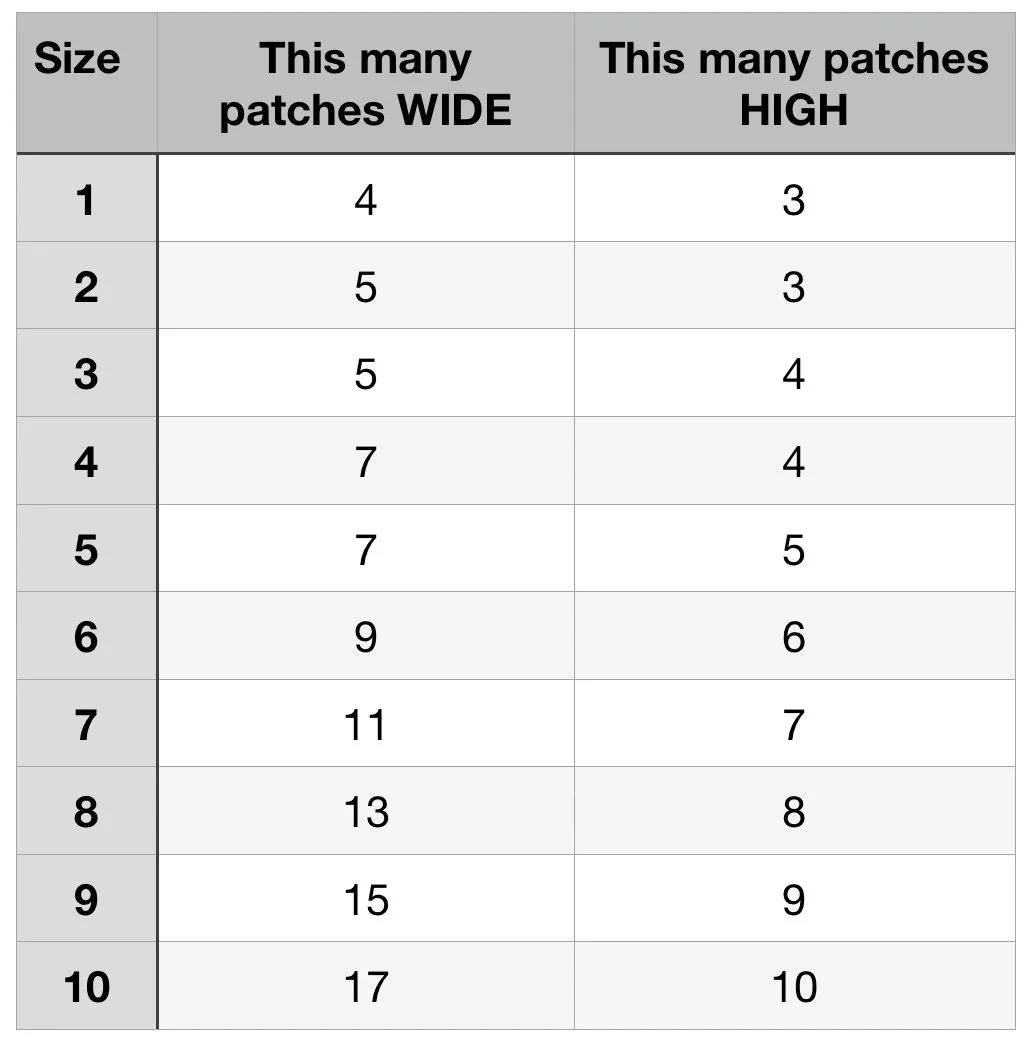
The Front Panel is one patch-row shorter than your Back Panel!
***
Read ahead to the end of the instructions before you begin & take a look at the Fit Check in case you want to estimate sizing before you work further on the Front Panel!
Take your Front Panel (the one that is one patch-row shorter than the other panel) - we’re going to work some collar shaping along the top edge.
First, we’ll add patches along each shoulder, then work two triangle patches at each collar edge that will allow the collar to curve nicely :)
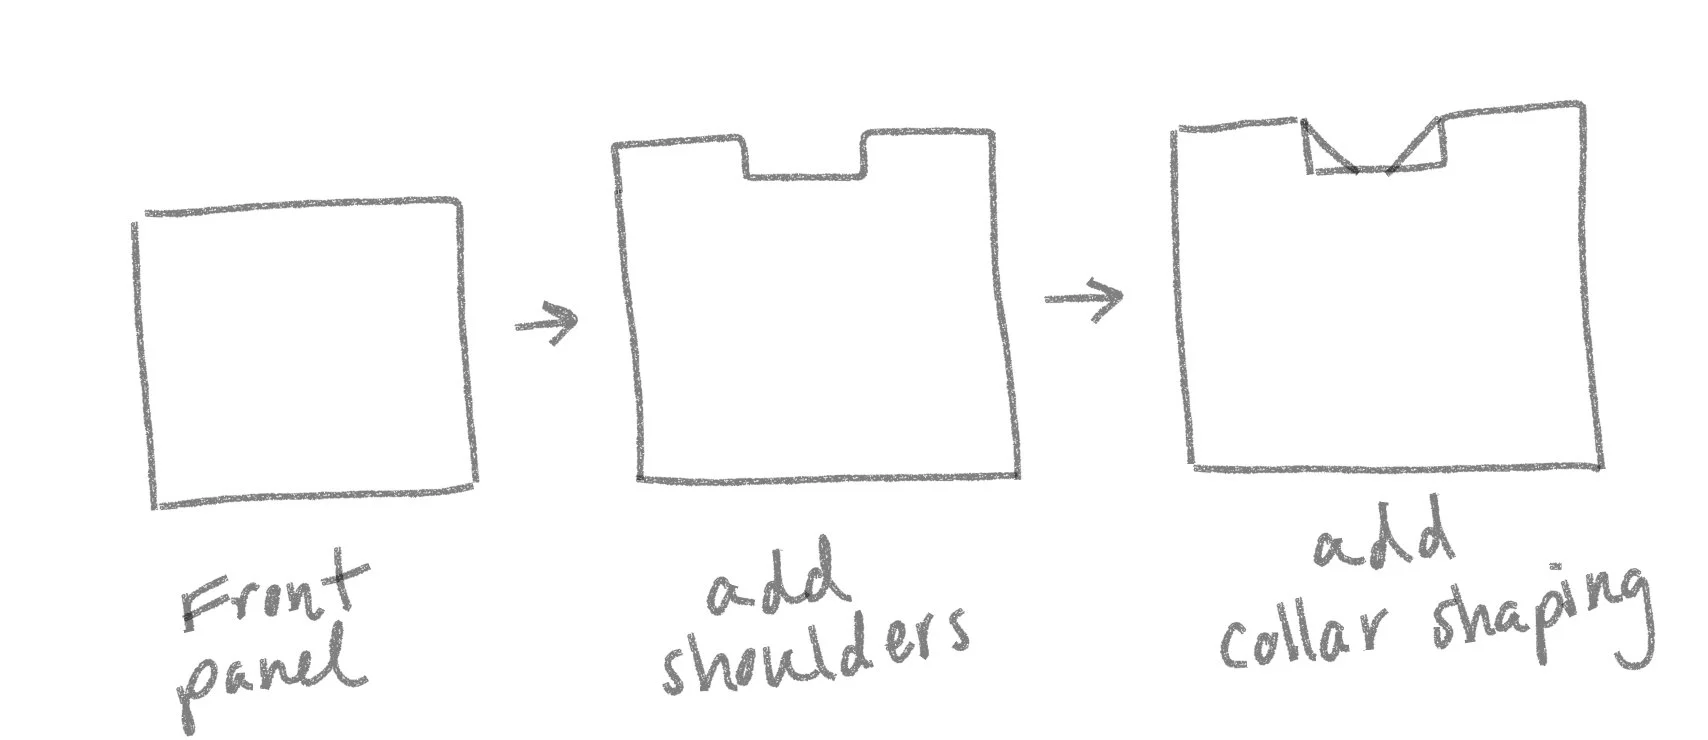
Shoulder Patches:
Work 1 (1, 1, 2, 2)(3, 4, 5, 6, 7) patches on top of the rightmost upper corner. Work 1 (1, 1, 2, 2)(3, 4, 5, 6, 7) patches on top of the leftmost upper corner.
You should have a 3 patch gap (Size 1 will have a 2 patch gap) in the middle of the top row.
Front Collar Shaping:
A triangle patch will be added on either corner of the front collar to allow for smooth collar shaping.
LEFT collar:
On the Left Front collar corner, pick up 32 stitches just like you would for a Fourth Patch.
Work this patch as follows:
Row 1 (WS): p2tog, purl to 2 stitches before m, p2tbl, sm, p2tog, purl to 2 stitches before end, p2tog.
Row 2 (RS): k2tog, knit to 2 stitches before m, k2tog, sm, ssk, knit to 2 stitches before end, k2tog.
Repeat the above two rows until 2 stitches remain, p2tog. Snip tail and thread it through the one remaining stitch to cast off.
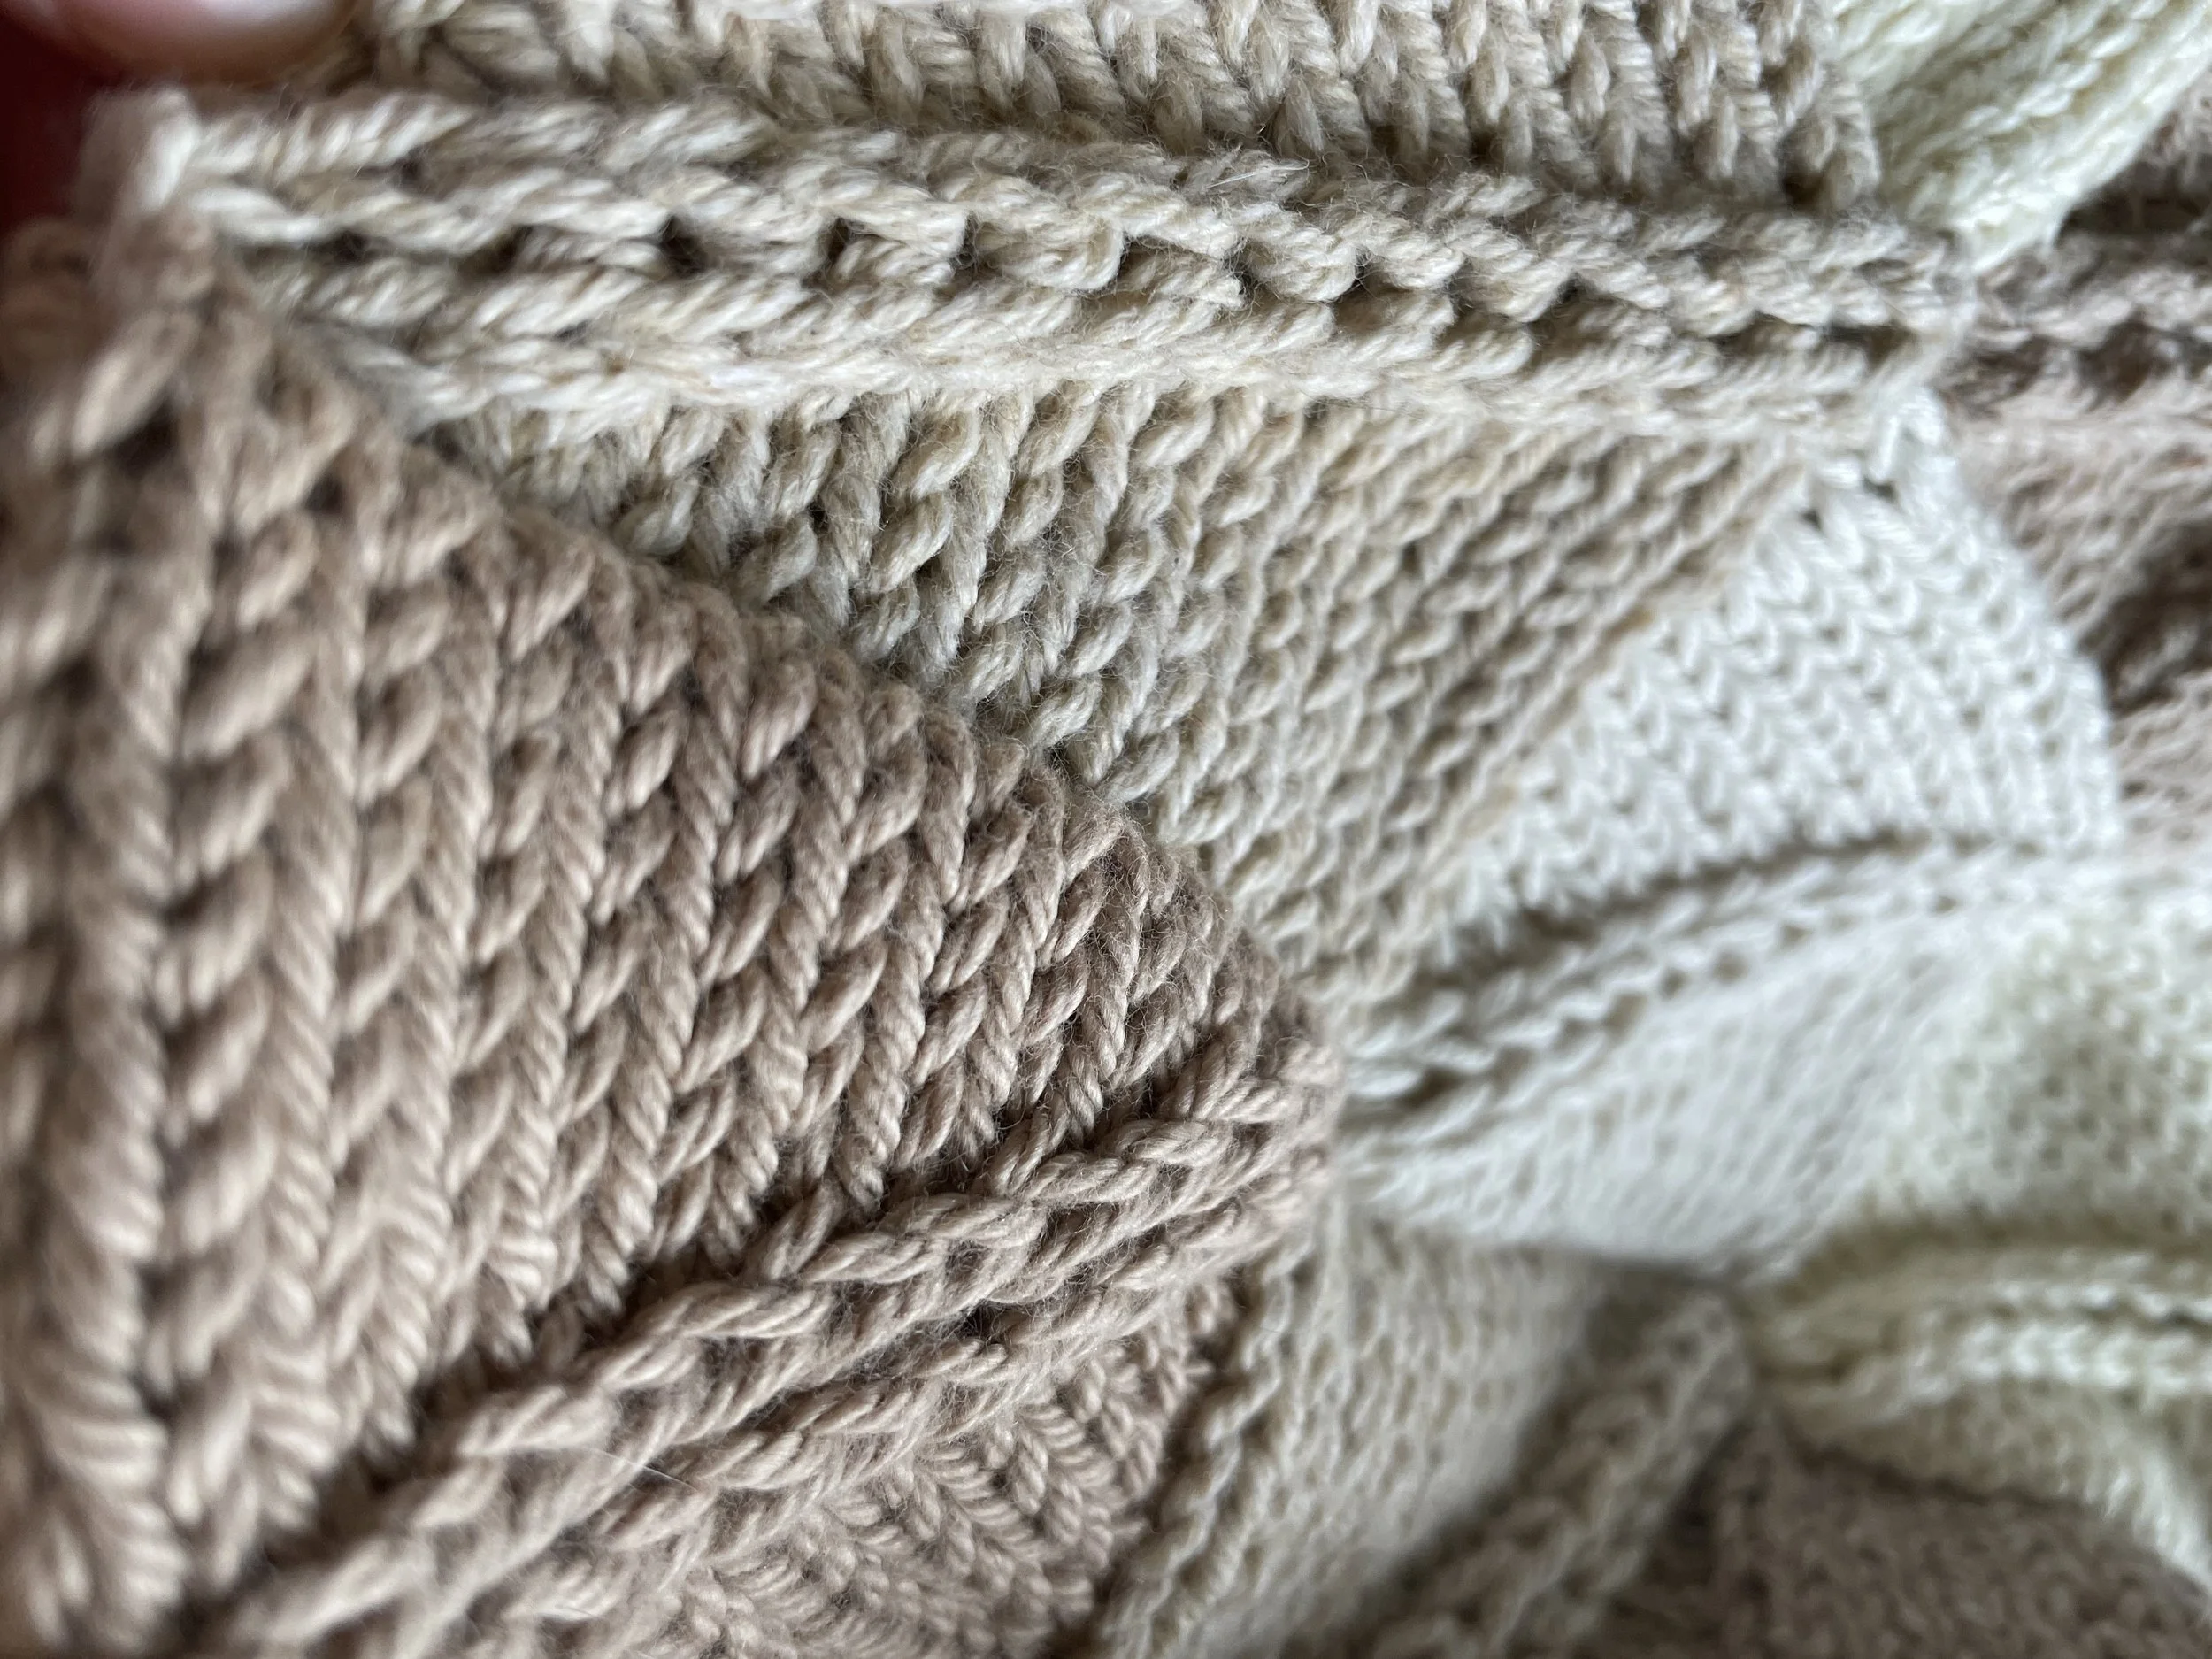
You should have a triangle shaped patch! Scroll ahead to see a photo of the completed collar shaping.
RIGHT collar:
On the Right Front collar, turn your entire panel one turn counterclockwise in front of you (see illustration below). Pick up 32 stitches in this corner, like for a Fourth Patch.

Work this patch in the same manner as described for Left Front collar above.
You should have a triangle shaped patch with the decrease slant in the opposite direction.
Your Front Panel now looks like this: though, in this photo the shoulders are seamed with the back panel as well.

Set the Front Panel aside!
FIT CHECK:
Now is a good time to take a look at the size of your pullover. Hold up the Front Panel to your chest & align the top edges of the shoulder patch row with the top of your shoulder.
There will be a 2-3” hem at the bottom of the pullover once complete, but if you need more length, add another row of patches to the bottom edge
If you’ve already worked your collar shaping: You will create a single row of patches to match the width of your panel, them seam it to the bottom of the Front Panel.
If you haven’t worked your collar shaping: You can work a new row of patches along the top edge of the Front Panel, then proceed to work the shoulder patches and collar shaping.
If you opt for this length mod, don’t forget to add another row of patches to the bottom of the Back Panel as well (for the Back Panel, you can simply work another row of patches along the top).
Off-ramp: Turn your project into a poncho and finish early! I might be a little jealous that I didn’t do this with mine :) - simply, seam the shoulders of the front and back panels. Poncho complete!
The panel work continues…
SLEEVES:
In the same way you have before, work TWO identical panels with the following dimensions:
FIT CHECK: pin your pieces together & assess the sleeve length!
SEAMING:
First, we’ll seam your Back Panel to your Front Panel at the two shoulders. Then we’ll seam the sleeves to the body. The seaming technique used throughout will be the same. See the below video for a visual walkthrough!
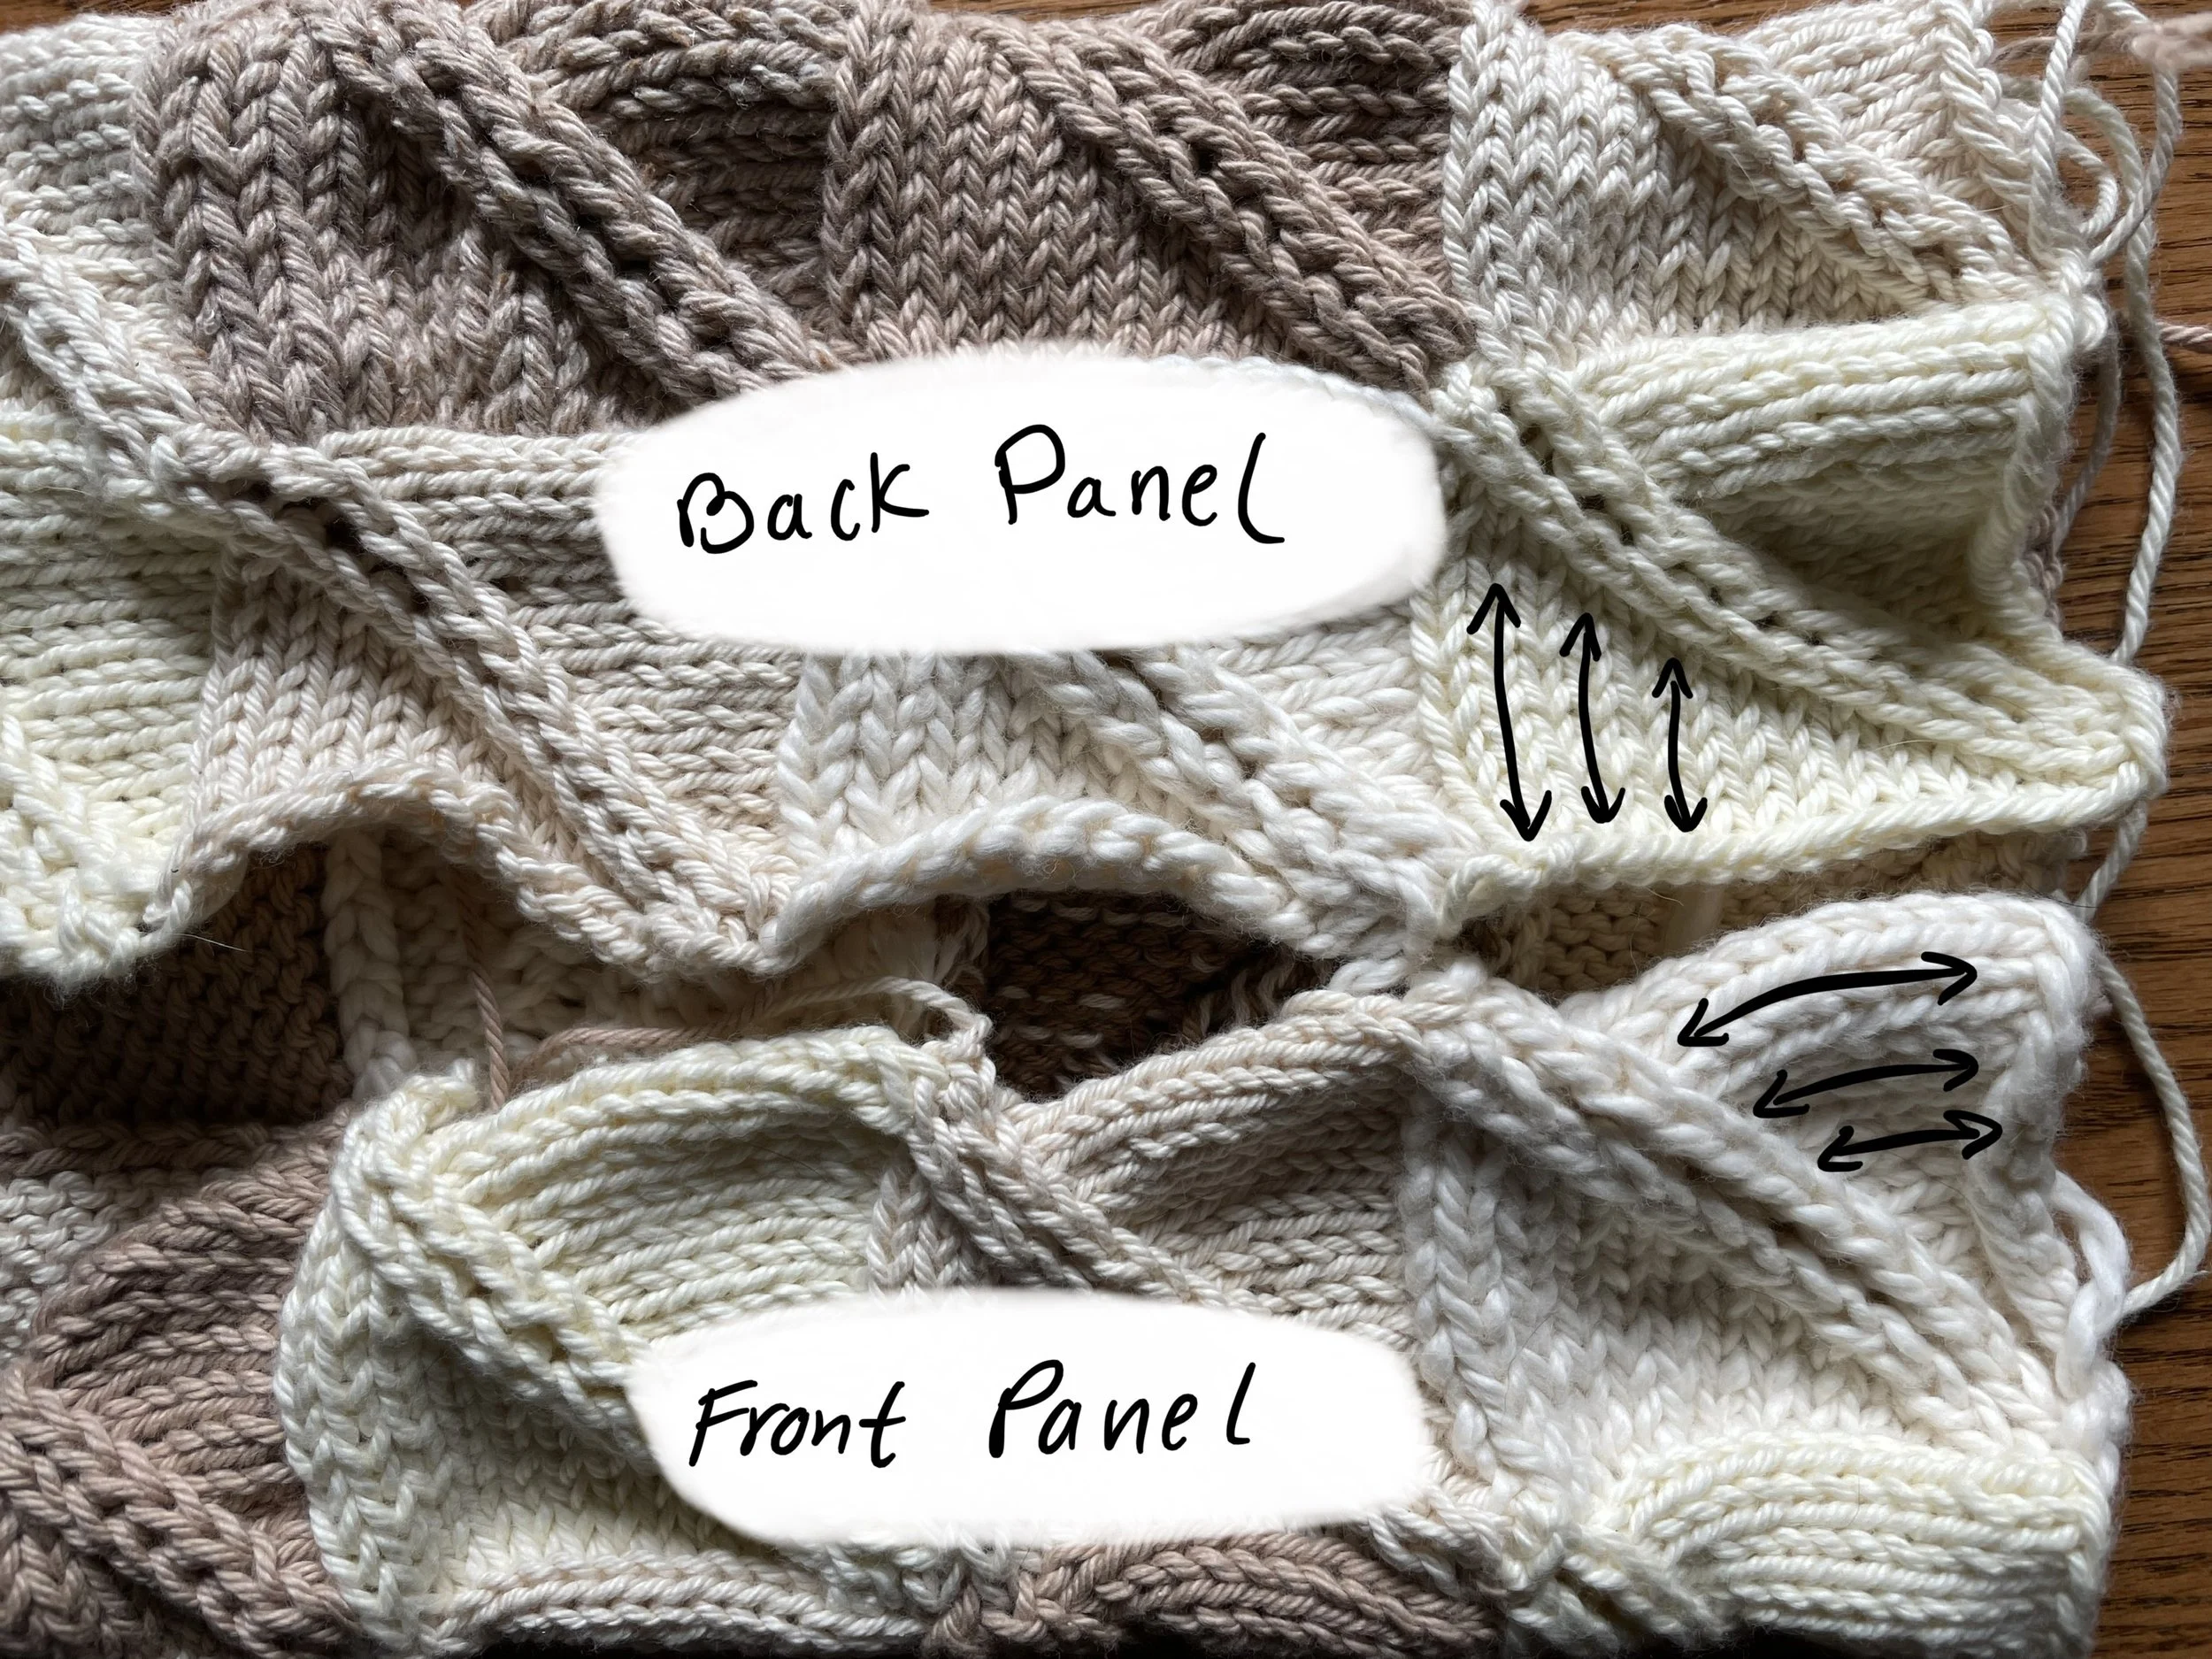
Shoulder seaming set up:
Lay the Back Panel down flat, right side up. Along the bottom border, you’ll notice that the stitches will be vertical. Lay your Front Panel down, right side up, below your Back Panel and align the edges. The top border of the Front Panel should have stitches that are horizontal. See the image below.
Seam the top shoulders across 1 (1, 1, 2, 2)(3, 4, 5, 6, 7) patches on each shoulder, working from the outer edge in towards the collar, like so:
Cut a long tail of yarn and thread it through your tapestry needle.
From the horizontal stitches, thread your needle through a bar in between the first edge-most knit stitch.
Next, thread your needle through the V of the edge-most knit stitch on the vertical stitches.
Continue threading back and forth between the bar of the next horizontal stitch and the V of the adjacent vertical stitch.
Tip: keep the corners of the patches aligned!
Once complete, tie off your thread and cut the tail. Weave in the end.
Repeat the seaming process across your second shoulder.
Attach the sleeves:
With your back and front pieces now seamed, lay this piece down flat, right side up. Lay your first sleeve down, right side up, with the LONGER patch side next to the body piece and align the center seam of the sleeve with the shoulder seam.
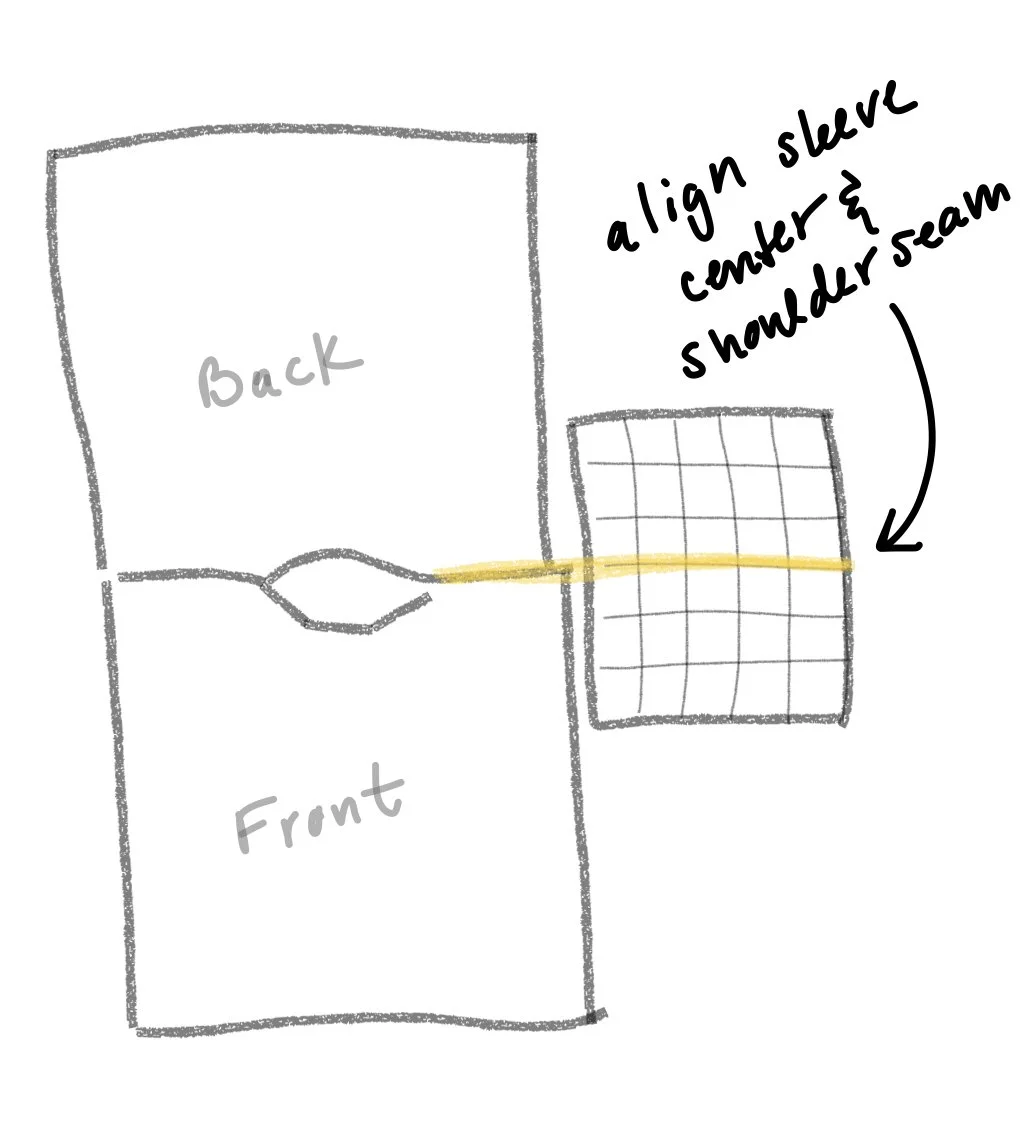
You should have an even number of sleeve patches on either side of the shoulder seam. Attach the sleeve to the body in the same seaming method used for the shoulders. Repeat for the second sleeve.
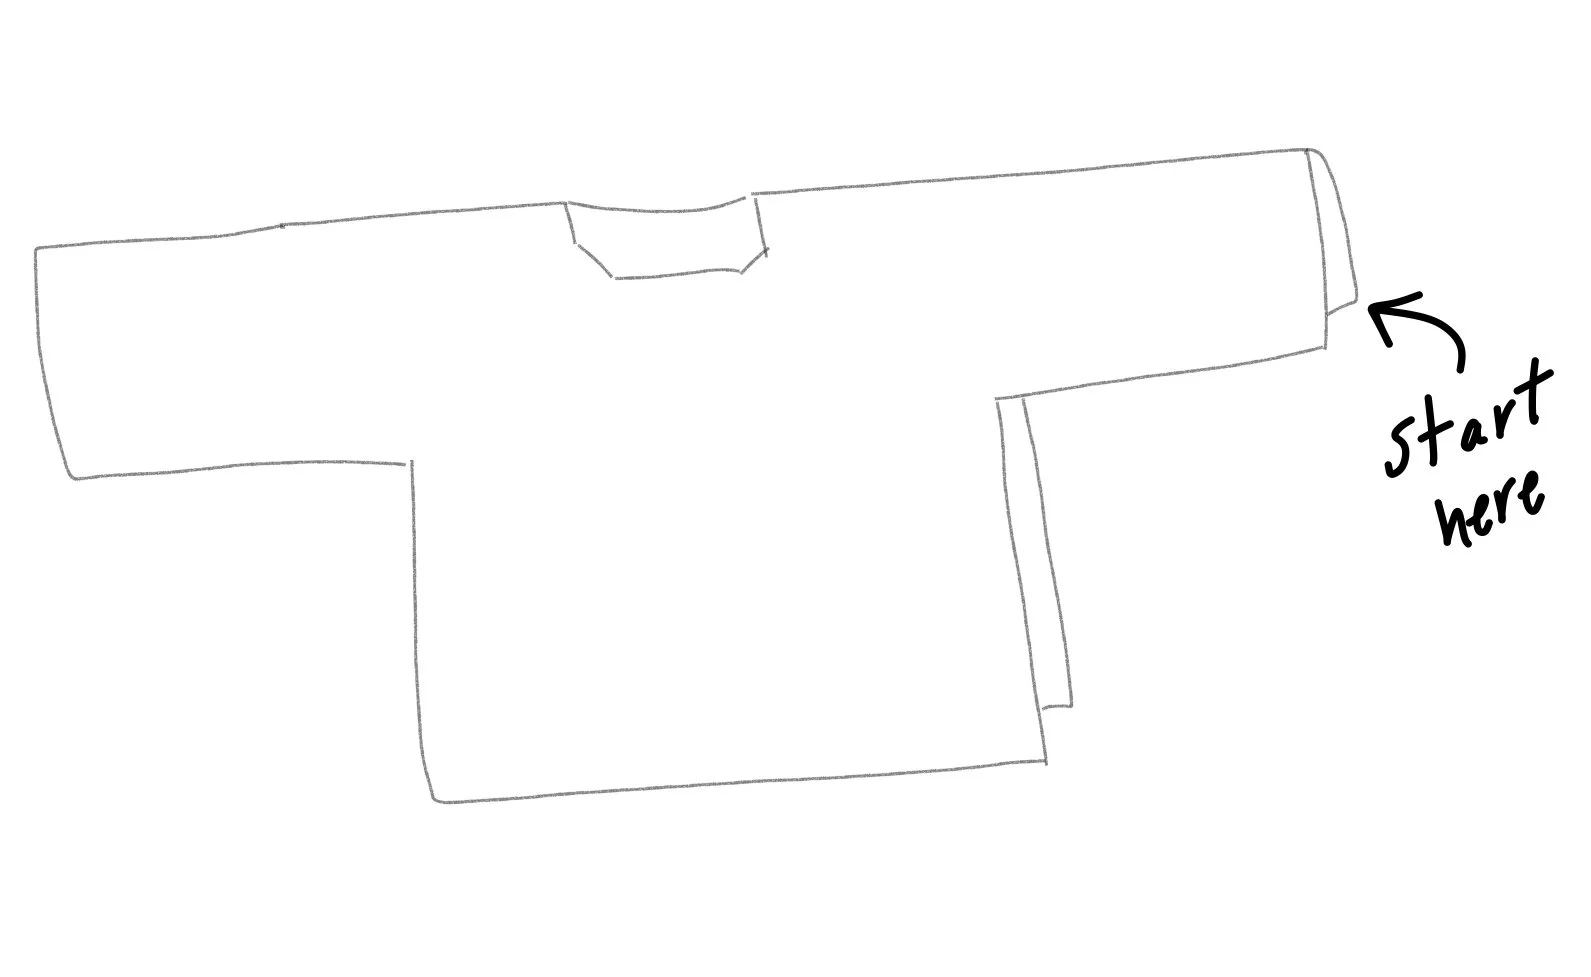
Edge Seaming:
Fold your pullover in half, wrong sides together. Begin seaming the edge together, starting from the outer corner of one sleeve and working your way towards the underarm, then down the side body. Repeat for the other side!
Each under-sleeve seam will be connecting horizontal to vertical stitches like you’ve done before. One body edge seam will also be horizontal+vertical. The opposite body seam will be connecting horizontal+horizontal stitches. Use the Mattress Stitch to work this seam:
Thread a tapestry needle with scrap yarn.
Insert needle under the first V on one of your knit edges. Pull yarn through (leave a tail for weaving in later)
Insert needle under the first V on the other knit edge. Pull yarn through.
Return to your first edge and insert needle under the next V. Pull yarn through.
Continue alternating between edges and working each V stitch one at a time, matching stitch for stitch.
See the below photos for a visual demonstration!
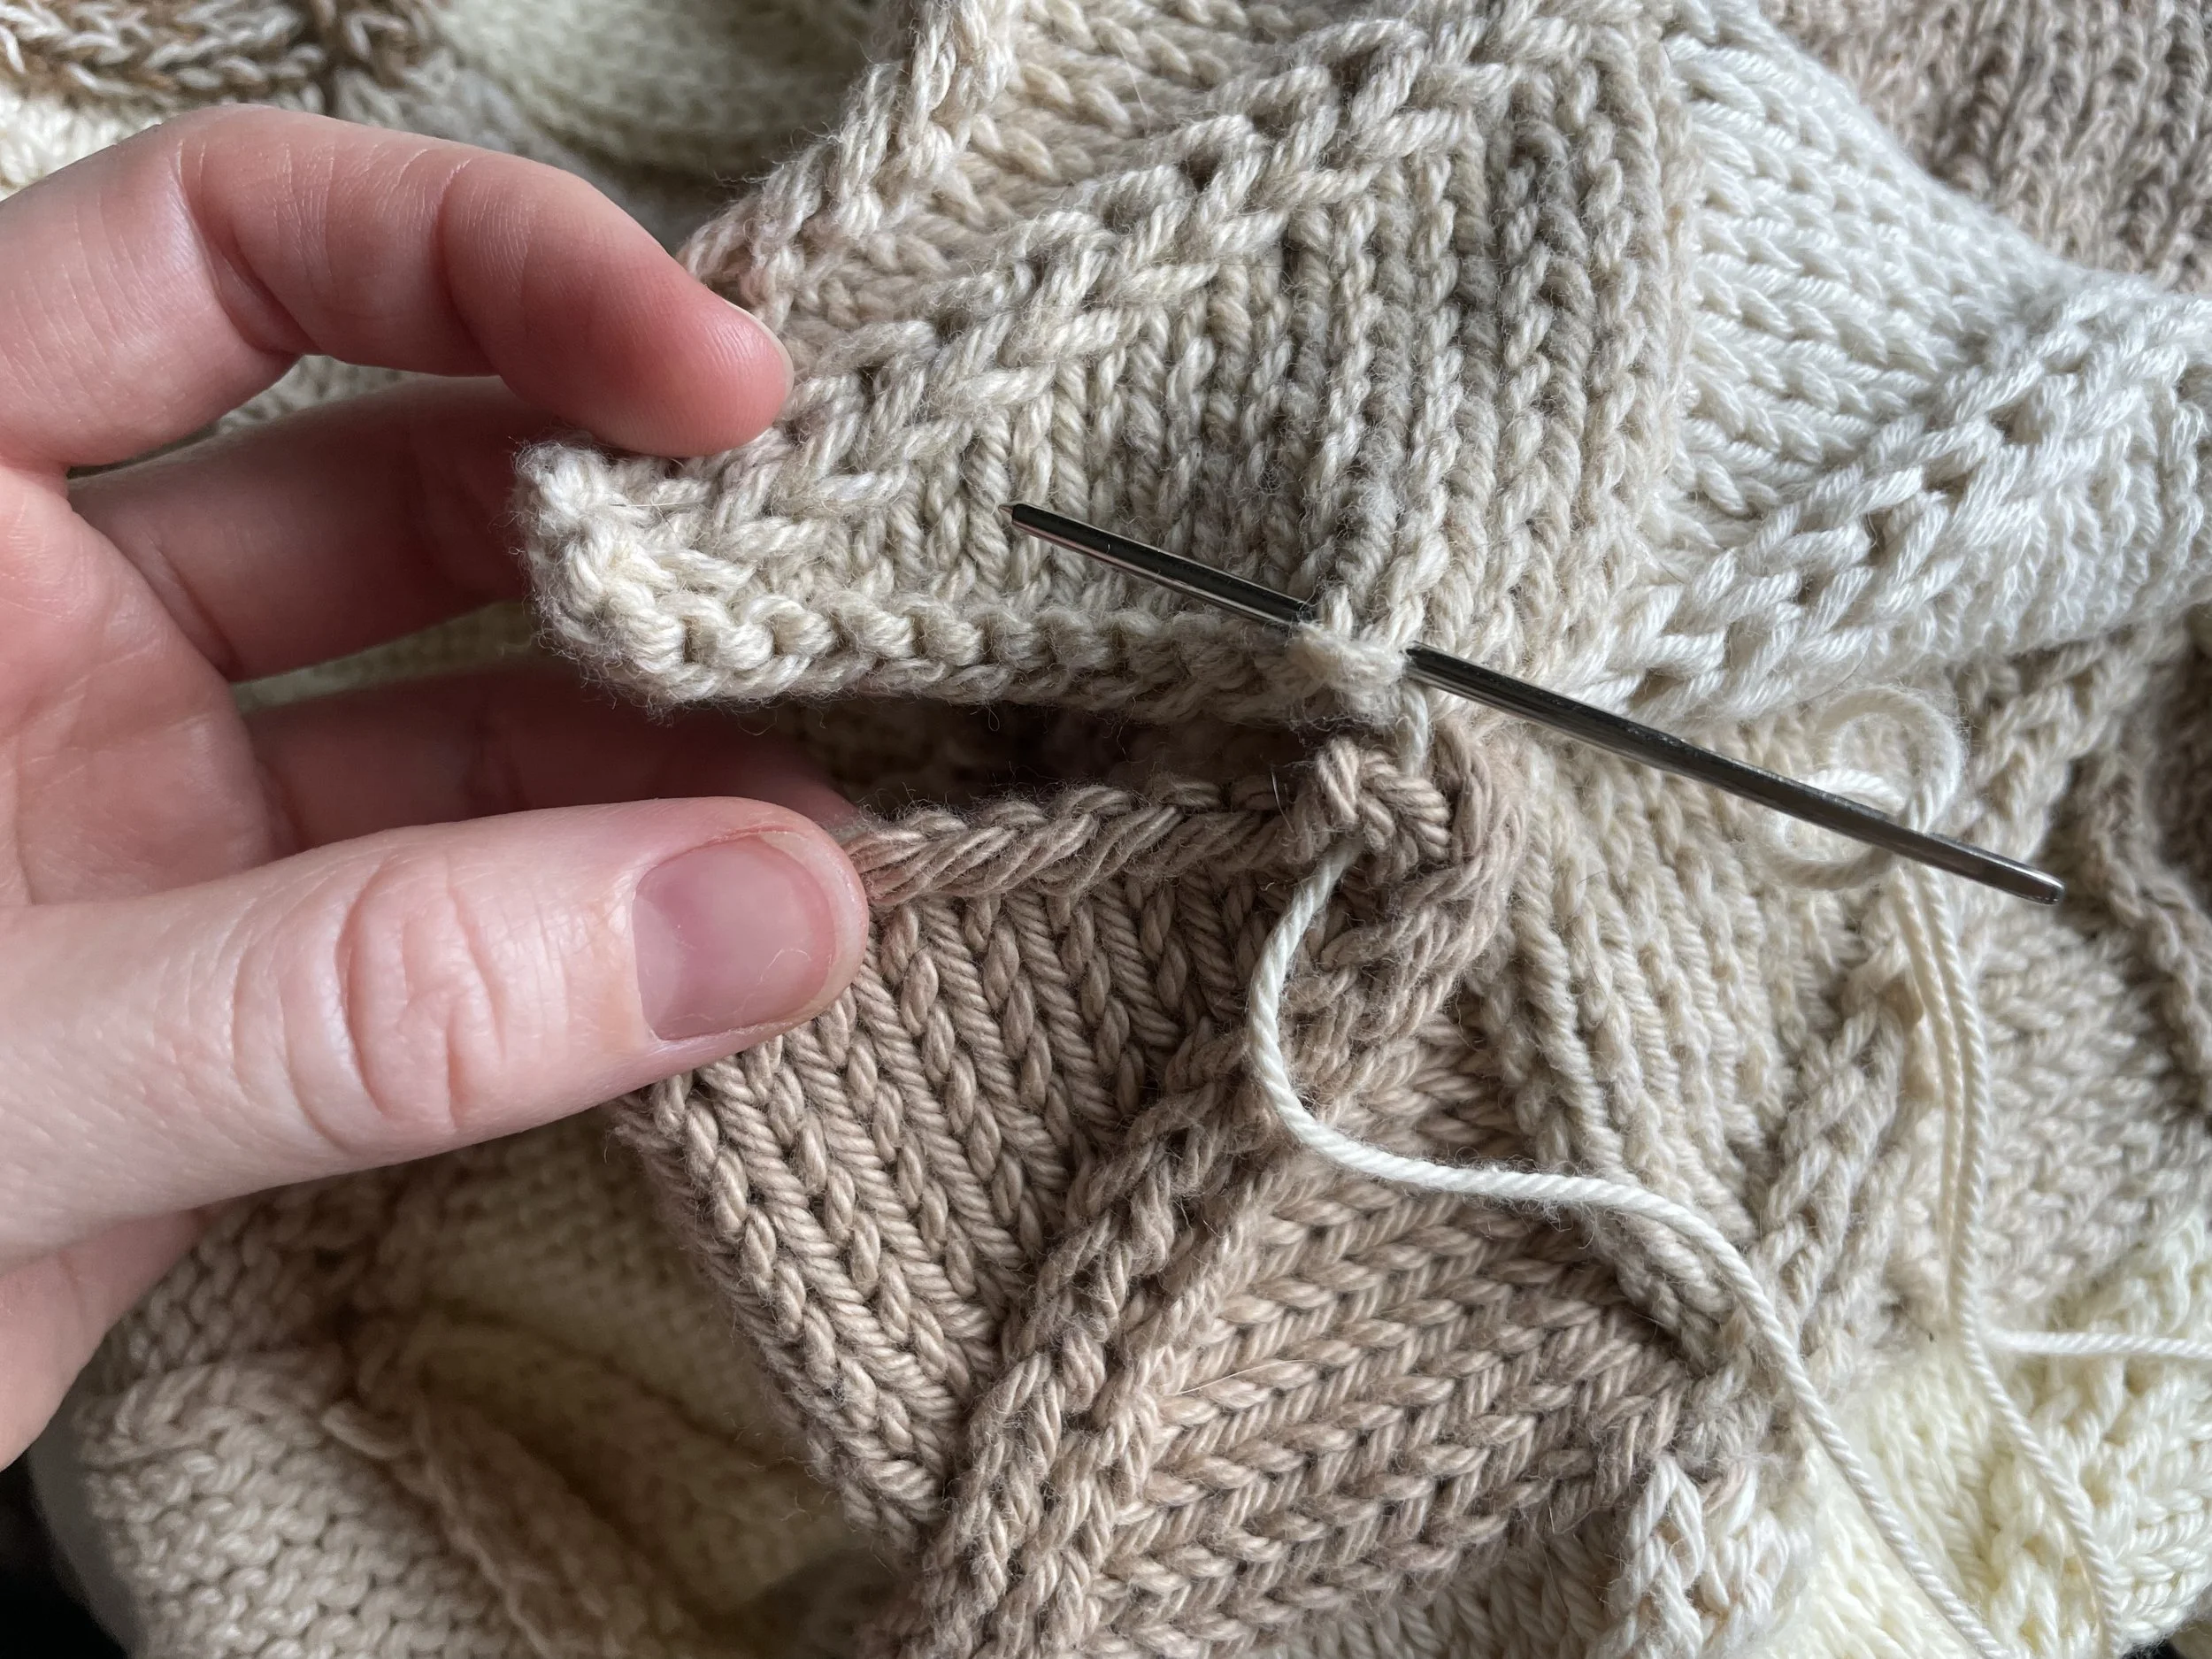
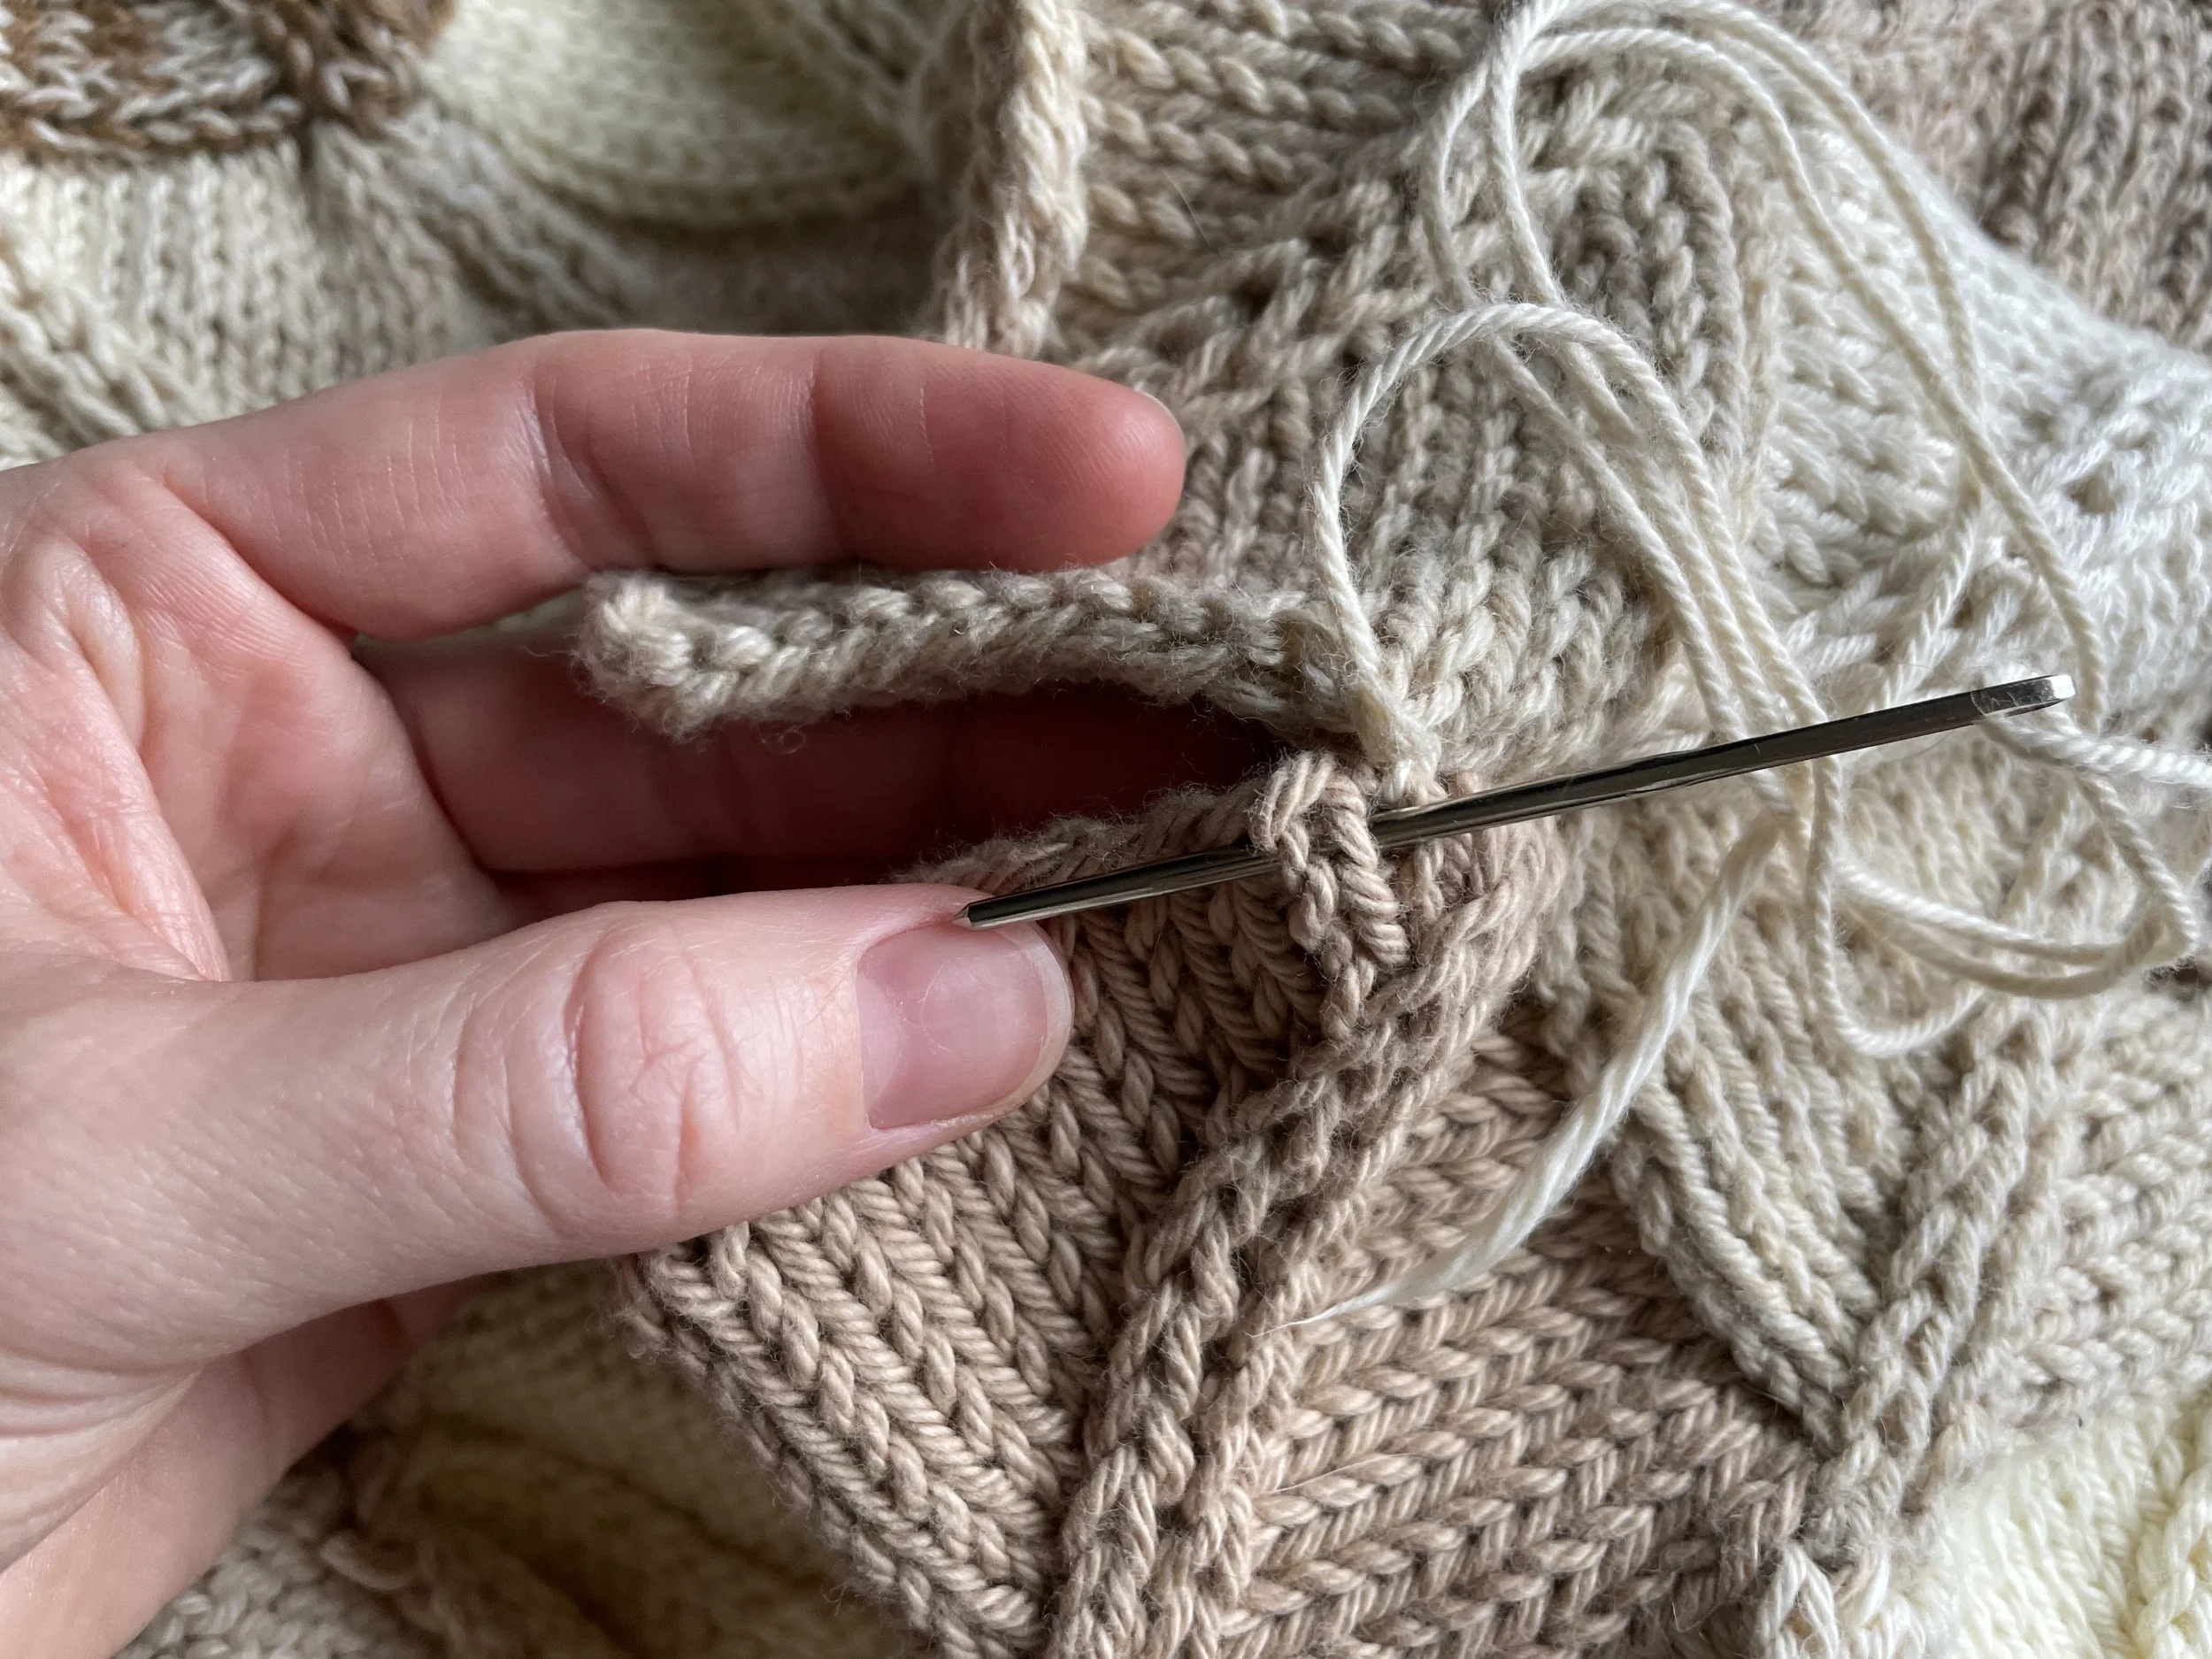
Your resulting seam will be invisible :)
Now, your pullover is in one seamed piece! Try it on! How does it fit? You can make some adjustments if you need to before the final day of instructions (working the hems). Add another row of patches to the sleeve ends or body for extra length - or unpick the patches you worked to shorten the piece.
The hems will add 2-3” more length to the sleeve cuffs and body length.
FINISHING:
Sleeve hems:
On the end of the sleeve, pick up every other stitch. Join in the round & work (k1, p1) ribbing for 2-3”. Cast off in Tubular bind off.
Bottom hem:
Along the bottom edge, pick up every stitch. Join in the round.
Round 1: (k2, k2tog) repeat to end, knit any remaining stitches.
Round 2: (k1, p1) repeat to end. Continue working k1, p1 ribbing until hem measures 2-3”. Cast off with Tubular Bind off.
Collar:
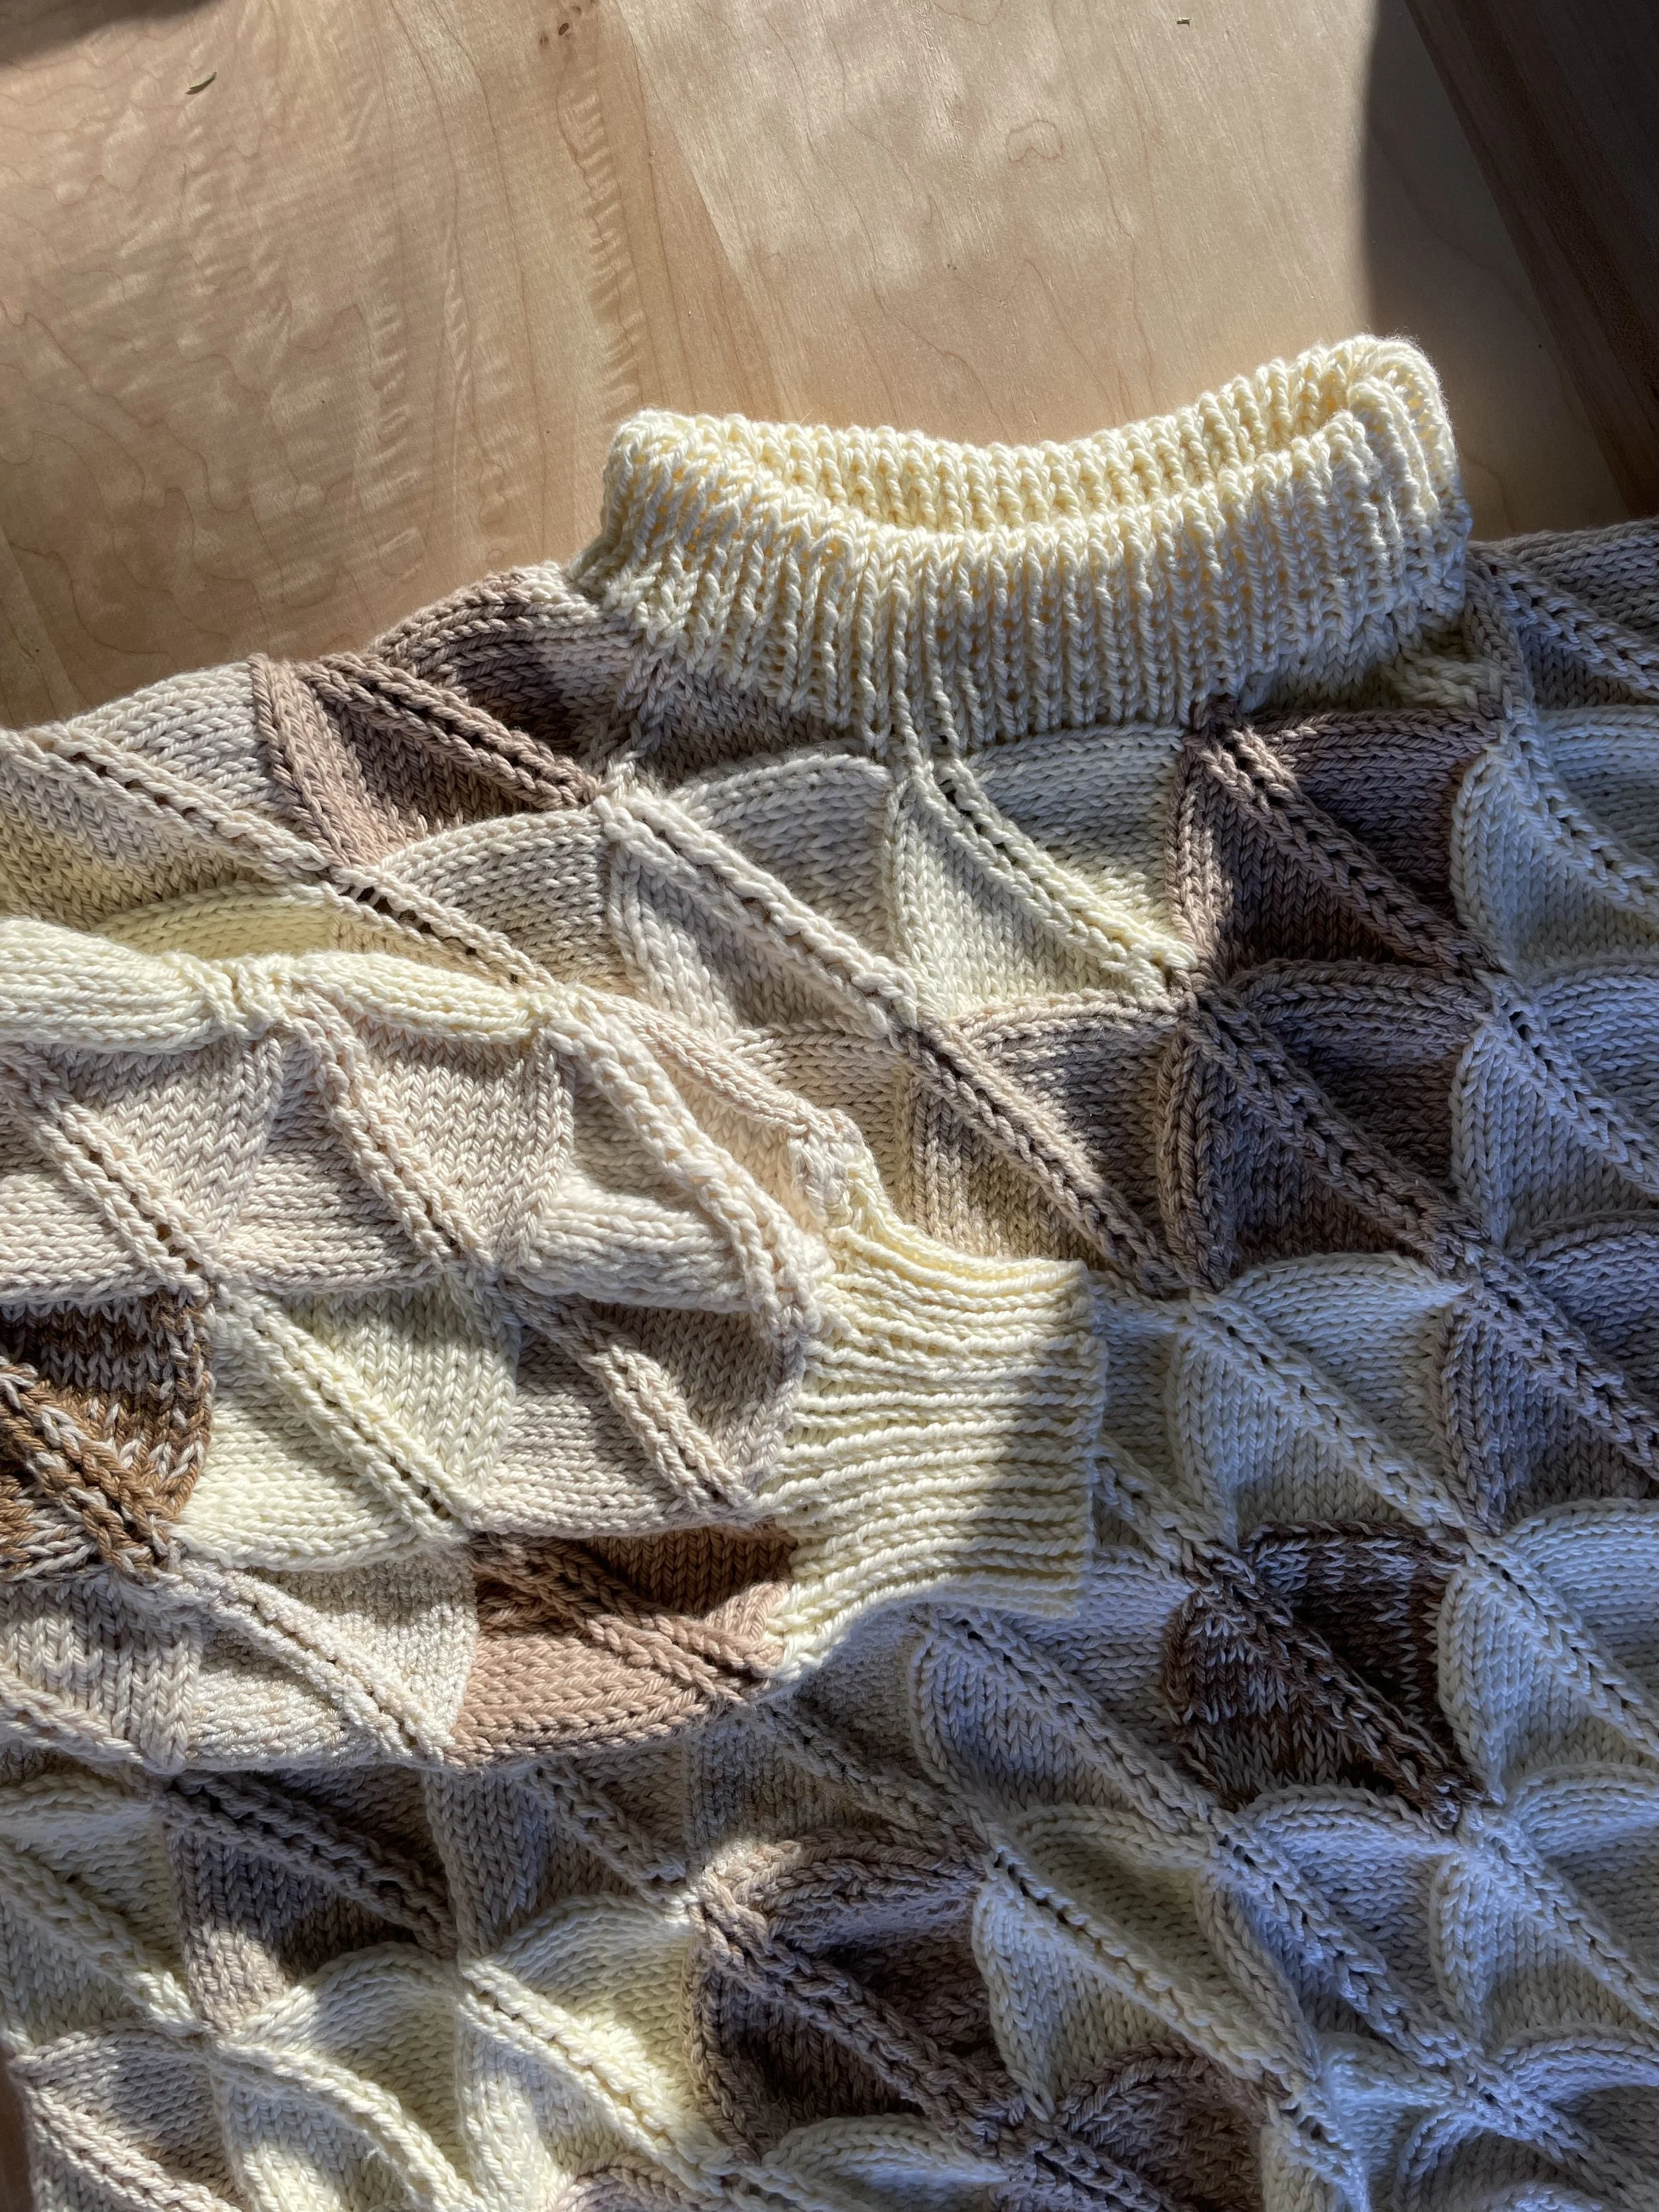
Along the edge of the collar, pick up every stitch. Join in the round & work (k1, p1) ribbing for 4”. Cast off regularly and cut a long tail.
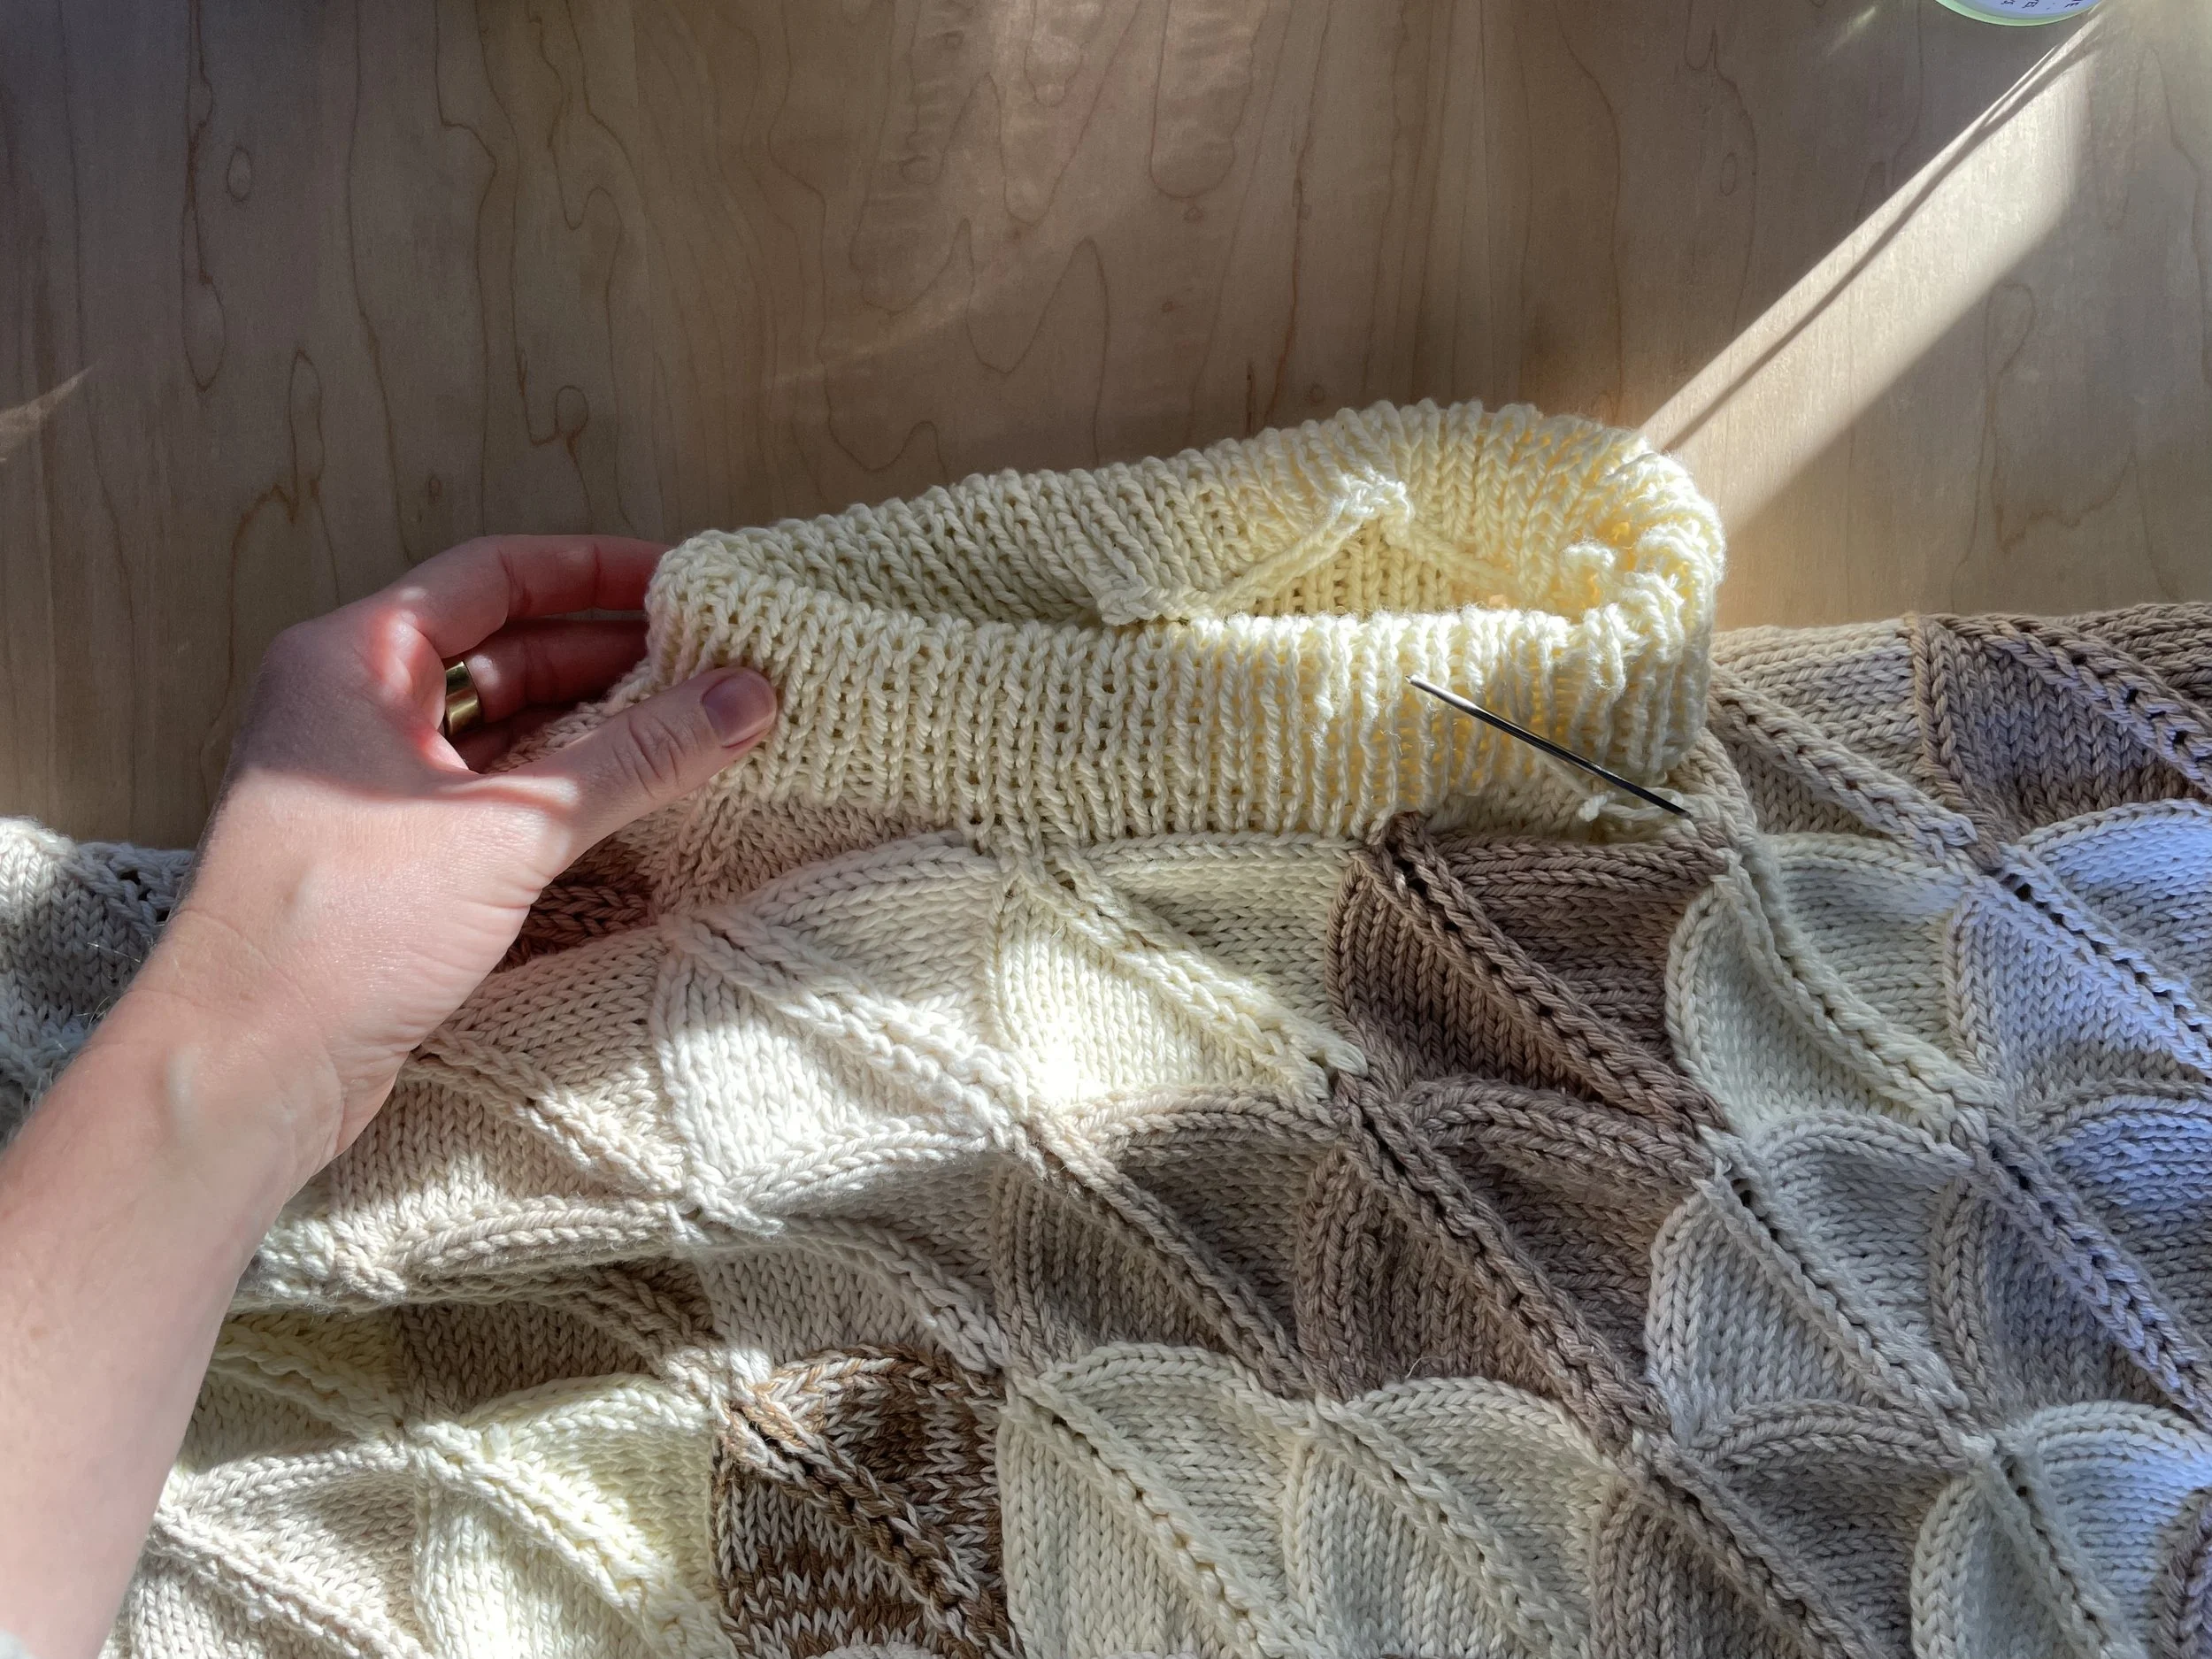
Fold down collar inward, wrong sides together. Seam the cast off edge of the collar with the first row of ribbing. Be sure to match the edges of the stitches so the color doesn’t twist. Do not seam too tightly, or the pullover will be difficult to fit over your head.
You’re Done!
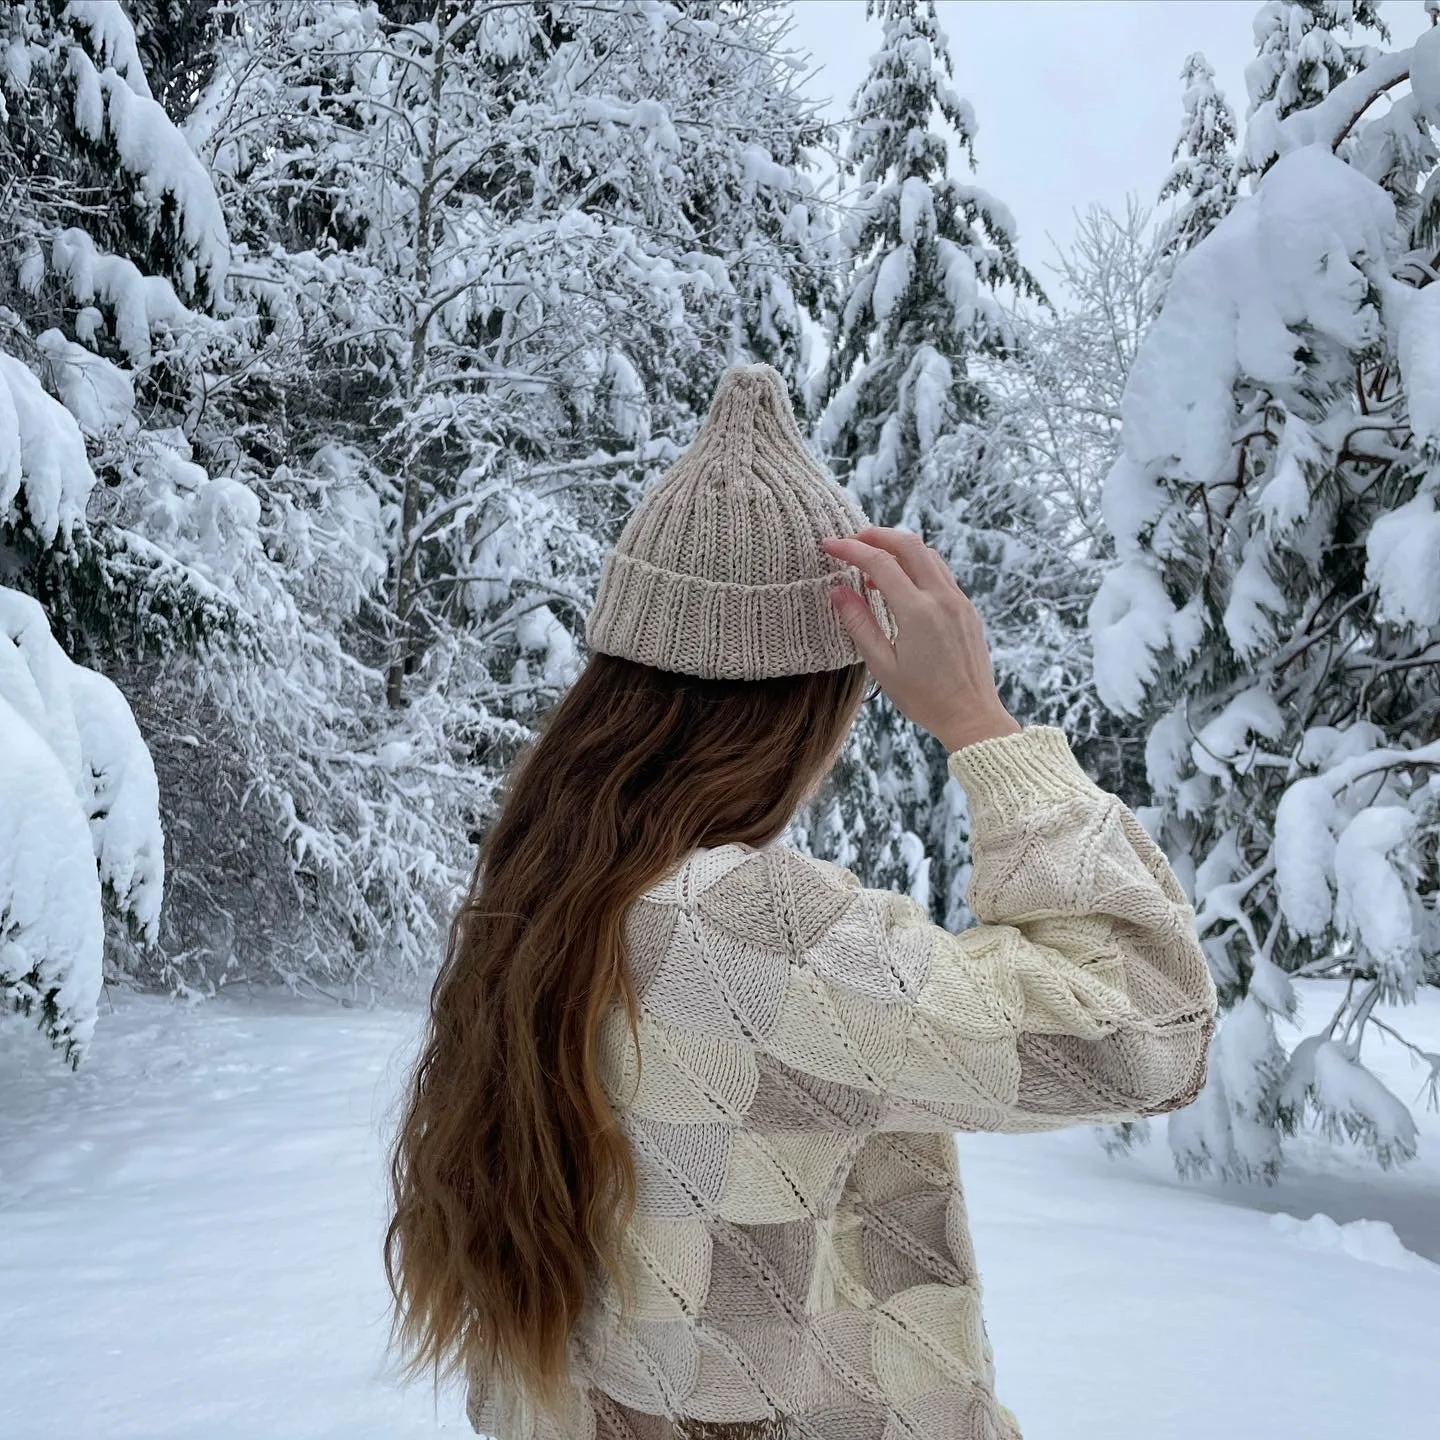
You’ve completed your Filtered Light Pullover!
Tag us on Instagram @northsideknitco and #nkcofilteredlight !